|
(For quick access, click here to go to the Recording Steps and
click here to go to the Panopto Settings Checklist at the bottom of this web page.)
If you often experience Internet connectivity problem, you may end up submitting your exams past the submission deadline. The penalty for late submission is that you will lose 5% for every late minute (starting at the beginning of the late minute). In order not to receive penalty for late submission, you need to provide PROOF to the instructor that your late submission was the result of Internet connectivity problem by following the instructions on this web page. For this web page, we will assume that your exam starts at X:00:00 and ends at X:40:00(replace X with your exam start time). As usual for this class, the left side of a time interval is "closed" (i.e., including the left timestamp) and the right side of a time interval is "open" (i.e., upto but not including the right timestamp). If your exam end time is different, please make adjustments accordingly. At X:40:00, you have 3 minutes to upload your exam answer text file to the submission server. You must attempt to make a submission as soon as you can at X:40:00 (you are not permitted to work on your exam as soon as the clock hits X:40:00). You should reload the exam submission web page and then make a submission. If your submission was successful (i.e., you see the submission ticket displayed in your web browser and the ticket looks right), then you are done and you don't have to do any of the stuff below! If your submission was not successful, but you were able to load/reload the exam submission web page and see that the time on the submission server would change, then you do not have an Internet connectivity problem. Most likely, your submission failed because the submission server is busy when many students are making submissions at the same time. (To make sure if this is the case, you can open another tab in your browser and see if you can connect to another web site. If you can, then you don't have an Internet problem.) In this case, you should just reload the web page and submit again, and keep repeating these two steps until you either (1) see the submission ticket displayed in your web browser, or (2) your browser failed to reload the exam submission web page because you have lost your Internet connectivity. (Please note that with some browsers, when you reload the exam submission web page, you will have to fill out the web form again.) If you encounter (1), you shold look for file_size, file_name, and server_time_string in the ticket to make sure that they are correct (i.e., you did not submit the wrong file); then you should save the content of the ticket web page into a PDF file for your record (saving a screenshot is really not a good idea; you need to save the entire ticket). If you have a copy of the ticket, you do not need an e-mail as evidence that the submission server has received your submissions. The ticket is all you need. Please understand that an e-mail can take days to get delivered. If you encounter (2), then you are experiencing Internet connectivity problem and you must start recording your desktop with the Panopto Recorder immediately to record all your desktop activities into a video file as PROOF that you have Internet connectivity problem when you are submitting your exam. Please follow the procedure below to create a proper Panopto video file (in MP4 format). Please understand that if your Panopto video does not contain all the required information, I cannot make an exception and must apply the late submission penalty mentioned above. Therefore, if you are unfamiliar with the procedure of recording your desktop and including all the required information, you should practice the steps below as many times as you need.
5 minutes BEFORE X:00:00, you should set things up for the exam and get ready to record your screen
(but don't start recording yet) in case you won't have Internet connectivity when time comes to submit your exam answers.
If you don't have Internet connectivity at this time, you should send the instructor an e-mail from your
smart phone as soon as possible and hope that the e-mail will get delivered quickly (please understand that it's possible
to take days for an e-mail to get delivered; but we should all try our best).
To get ready, please do the following 5 minutes BEFORE X:00:00:
Please remember, you ONLY need to make a recording if you don't have Internet connectivity at or soon after X:40:00.
At X:40:00, if you have already made a successful submission (i.e., you have seen the ticket
and the ticket looks right)
and you haven't changed your exam answers text file, then you are done and there is no need to record anything.
Otherwise, please read on.
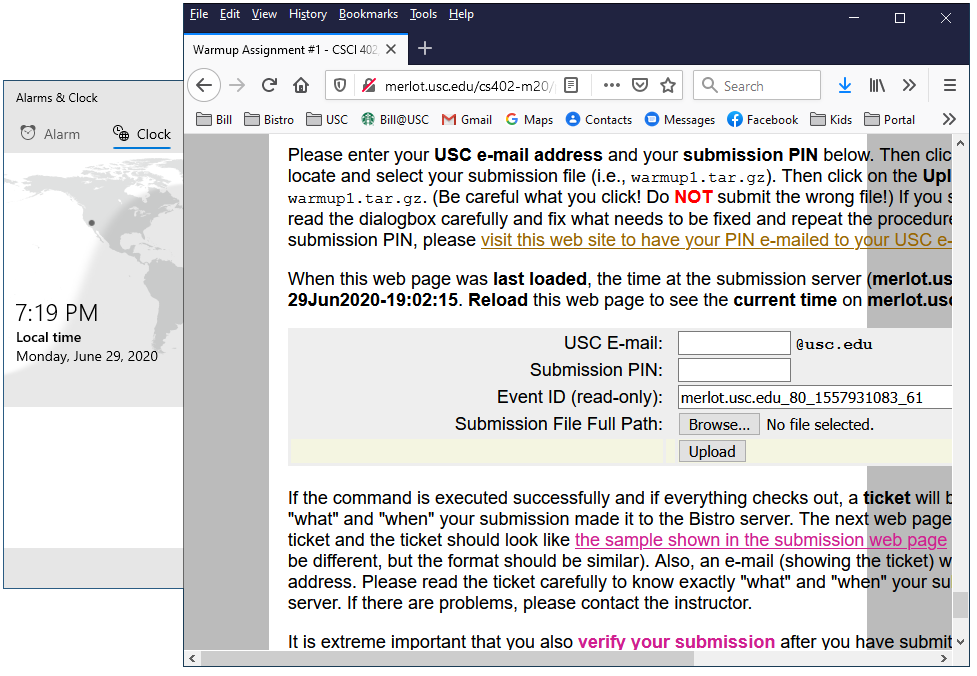
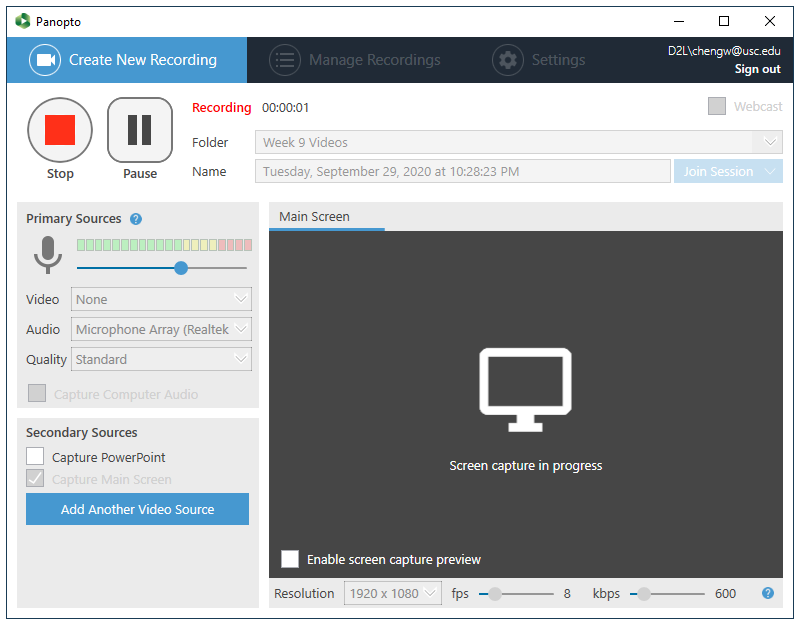
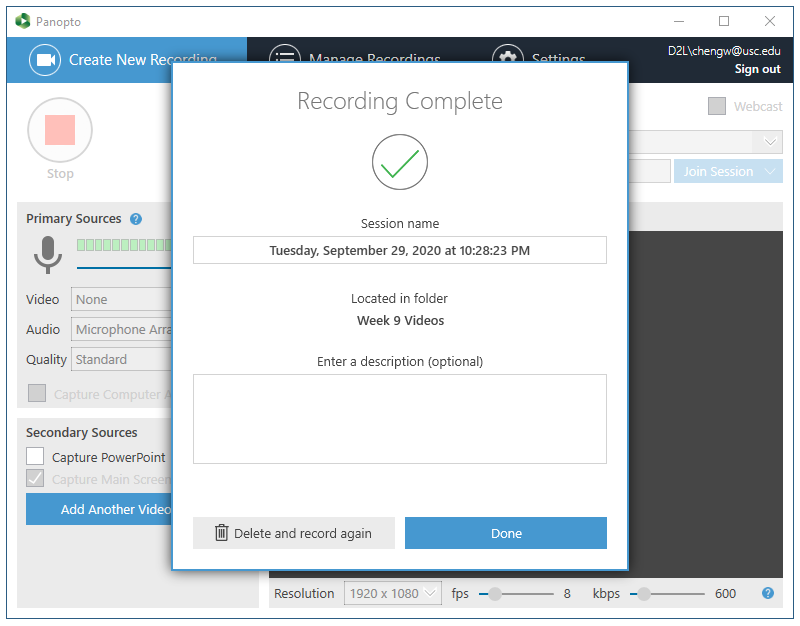
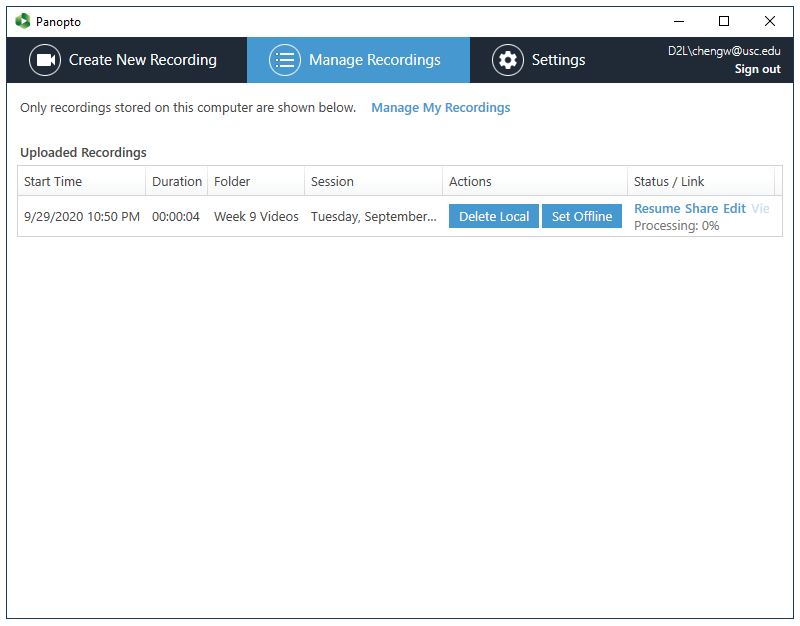
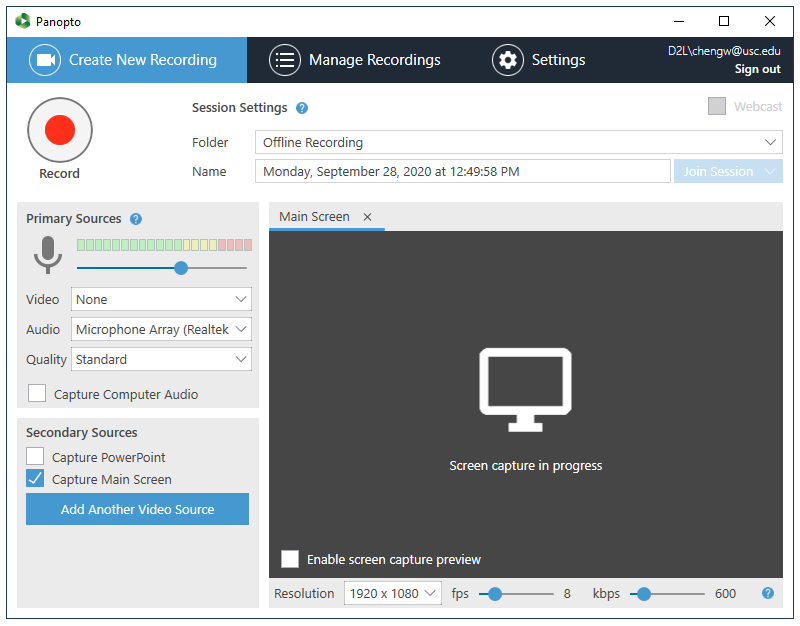
Assuming that you have done all the preparation work mentioned above, at X:40:00, you should reload the exam submission web page. If you can see that the time on the submission server would change, then you do not have an Internet connectivity problem. Most likely, your submission failed because the submission server is busy because many students are making submissions at the same time. (To make sure if this is the case, you can open another tab in your browser and see if you can connect to another web site. If you can, then you don't have an Internet problem.) In this case, you should just reload the web page and submit again, and keep repeating these two steps until you either (1) see the submission ticket displayed in your web browser, or (2) your browser failed to reload the exam submission web page because you have lost your Internet connectivity. If you see the ticket (i.e., case (1)), you should make sure it looks right and you are done and there is no need to record anything. Otherwise (i.e., case (2)), please proceed below. It's best to do two things. One is to make a video record of the Internet connectivity problem and record the content of your answers text file. The other is to take photos of your answers text file with your smartphone and e-mail those photos to the instructor immediately. The steps below include instructions for both of these activities. In the unlikely event that the submission server is actually down (i.e., you can still reach other web sites but connection to the submission server failed again and again), as an insurance policy, you should e-mail your answers text file to the instructor. In this case, you should just reply to the e-mail that contained the exam download and submission instructions, attach your answers text file, check to make sure that the e-mail recipient is either <bill.cheng@usc.edu> or <chengw@usc.edu> and click Send to send a backup copy of your answers text file, just in case the submission sever is actually down. Then go back and continue to make a submission using the web form since it's possible that the submission server has returned while you are e-mailing. Again, e-mail can take a long time to deliver. It's best to use the submission web form and get a ticket so you have proof that my server has received your submission. There are 3 things you must include in your recording. (1) The clock app showing the current time (and ticking away). (2) The web browser that's having trouble connecting to the exam submission web site. (3) The entire content of your exam answers text file. At this time, your Panopto Recorder should be running, configured correctly, and not recording and it should look like the following: Now click on the red Record button in the Panopto Recorder. Wait a couple of seconds and your screen should look like the following to mean that recording of your desktop has started: Here's what you must do: Now that you have finished recording what's required, you should click on the red Stop button in the Panopto Record and your screen should look like the following: You should enter a short description and click on the Done button and your screen should look like the following: Click on the light blue "Set Offline" button and you are done! Do not click on the Delete Local or Delete button or you will lose your video. To figure out where the video file is saved, please click on "Settings" on the very top of the Panopto window.
Now that you have created a video recording of your exam answers text file,
you must first go to main Panopto screen and click on Manage Recordings near the top
to see all your recordings and take a photo of your computer screen with your smartphone to show that a new video has been created,
then IMMEDIATELY e-mail this photo to the instructor from your smartphone to let the instructor know that you have
just created such a video. This e-mail must be sent right after you have created the video (i.e., within 2 minutes).
Otherwise, we will have no idea if you were messing around with the system clock or editing the video to show an earlier time.
After you have sent that e-mail, you still need to submit your exam answers text file using the exam submission web form.
Since you cannot connect to the Internet from your laptop/desktop, you won't be able to use the exam submission web form at this time.
So, you need to get a copy of your exam answers text file to the instructor as soon as you can.
If you can transfer your exam answers text file to your smart phone, you should do that and e-mail your exam answers text file to the instructor. If you cannot transfer files from your computer to your smart phone, you can take photos of you exam answers text file (one photo per page and make sure that every page is readable) and e-mail these photos to the instructor. In your e-mail, you should mention that you did not have Internet connectivity at X:40:00 and you have an MP4 video to prove that you did not have Internet connectivity at that time. But please do NOT attach the video file in your e-mail. When you get your Internet back, you should submit your exam answers text file using the exam submission web form and send me another e-mail to let me know that you have just submitted your exam answers text file. Finally, please do NOT e-mail your MP4 file to the instructor unless I explicitly ask for it. Your video file may be too large to be sent over e-mail and you need to discuss it with the instructor to figure out what needs to be done. Just make sure you don't delete it accidentally.
Below are instructions on how to download and install the Panopto Recorder.
Download PanoptoYou must first log into D2L and click on our class before you can download and install the Panopto Recorder. Please do that first. Then visit the information page about Panopto for all the details. If your machine is a Windows machine, click on "Creating a new session - Windows", then click on the "Panopto recorder for Windows installation instructions" link and follow the instructions there. If your machine is a Mac, click on "Creating a new session - Mac", then click on the "How to Download and Install Panopto for Mac" link and follow the instructions there.Launch PanoptoAfter the Panopto Recorder has been installed, you should launch it. You can look at the Panopto information page and click on the "Creating a new session" button to see what the Panopto Recorder should look like on Windows or on a Mac. Below, I'm using the Windows version as an example.Configure PanoptoWe only want to use the Panopto Recorder to record your desktop and do so without an Internet connection (i.e., record offline). Please follow the instructions here very carefully.
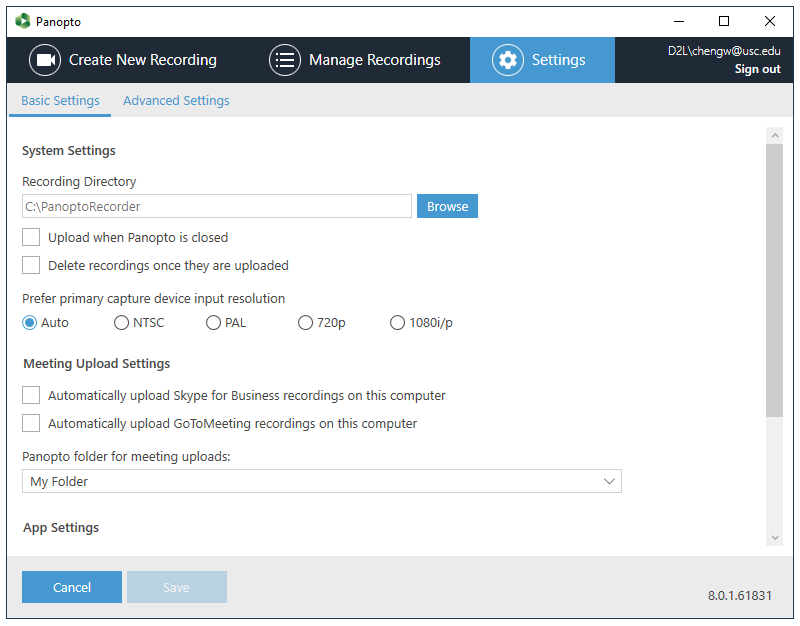
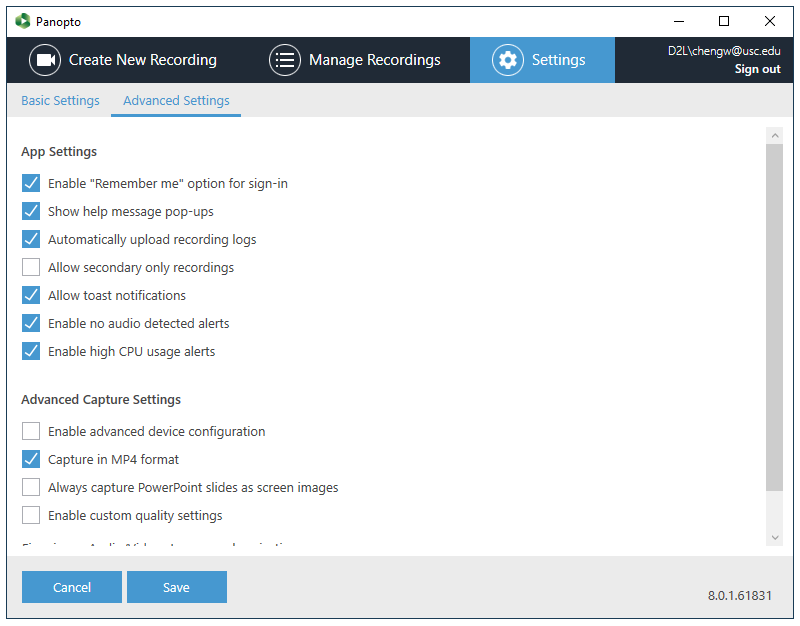
Configuration ChecklistIt's imperative that your settings are all correct. It's a very good idea that you don't touch any of the settings unless you are asked to touch them. Below is a checklist that you should use to verify your settings before you start recording:
|
||||||||||||||||||