|
The AWS (Amazon Web Services) has a Free Tier where you can get
an account for one year for free with limited functionalities and usage caps. Luckily, it's enough to install
a standard 32-bit Ubuntu 16.04 that we need to do our assignments.
VERY IMPORTANT: The installation procedure described on this web page is for installing your own virtual appliance into AWS. This is not the preferred way to set up a virtual machine in AWS to do your programming assignments! The preferred way to set up a virtual machine in AWS is to import an Amazon Machine Image (AMI) that's already been set up for you. If you follow the procedure on this web page, it's possible that you will go over the usage caps and AWS will charge your credit card for going over the usage caps! Therefore, you should only follow the procedure here if you are ready to pay for using AWS, even if you are in the Free Tier. Many thanks to the following Spring 2023 CS 402 students for giving me pointers to get this all figure out: Adam Pryor, Rulin Xing, and Kevin Kang.
Here are the steps to create a standard 32-bit Ubuntu 16.04 system on AWS:
Step 1: Download Virtual ApplianceWe will install a pre-canned 32-bit Ubuntu 16.04 system from a virtual appliance called "awsvnc32xu16047-vbox6140-f1". There are two places from which you can download this virtual appliance:
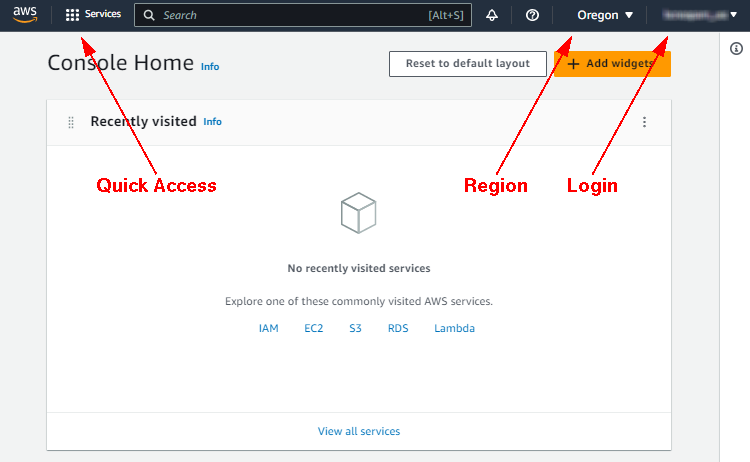
Step 2: Create An AWS AccountThis step is idential to Step 1 of the regular installation procedure (for the Oregon region).Step 3: Go To Your AWS ConsoleGo to your AWS (Management) Console. If you got logged out, you will see the Sign In screen. Click on the "Sign In Using Root User Email" button. Then in the Root User Email Address, enter your USC email address, then click on the Next button. Enter your AWS password and click on the Sign In button to log in and you should see the following screen:Even though you are in southern California, the best choice for your region is probably the Oregon region (also known as the "us-west-2" region, and it's shown as the current region in the above image). The N. California region (also known as the "us-west-1" region) is heavily utilized and some resources may not be available at all time and it can be very frustrating to use. If you are okay with doing everything in the Oregon region, you should follow the regular installation procedure (for the Oregon region) and not follow the procedure here. If you have chosen a different region, please proceed (and replace all instances of "us-west-2" below with your region identification string). In the Recently Visited area, there are 3 important links. IAM stands for "Identity and Access Management" and it provides access permissions. EC2 is for creating and managing virtual machine instances. S3 is for creating and managing "storage buckets". Step 4: Create IAM User Account/OrganizationThis step is almost idential to Step 3 of the regular installation procedure (for the Oregon region) (except for the "region" part).Step 5: Create IAM Service Roles And PoliciesGo to the IAM Dashboard and click on Roles in the left panel. This is done in the Global region (and you cannot select the Oregon region here). So, this is fine. In the right panel, you should see the AWSServiceRoleForOrganizations and the AWSServiceRoleForSSO roles. If you don't, you have to go back to the beginning of Step 4 and try again.Click on the Create Role button in the right panel. Select Custom Trust Policy in the Trusted Entity Type area. Delete all the code in the Create Trust Policy area and replace it with the following text:
Scroll all the way to the bottom of the page and click on the Next button.
On the next screen, just scroll all the way to the bottom of the page and click on the Next button.
Enter "vmimport" as Role Name and enter "My vmimport" in Description and scroll all the way to the bottom and click on the Create Role button.
This will allow you to import your own virtual machine from the virtual appliance you downloaded in Step 1 above.
Click on Policies in the left panel and click on the Create Policy button in the right panel. Click on the JSON button and delete all the code there and replace it with the following text (where USCNETID is your USC NetID):
Scroll all the way to the bottom of the page and click on the Next (or NextTags) button. On the next screen,
enter "bucketaccess" as Name and enter "My bucketaccess" in Description and scroll all the way to the bottom and click on the Create Policy button.
Click on the newly created "bucketaccess" policy and click on the Policy Usage tab. (Since there are so many policies, you may need to type "bucketaccess" in the Search box and click on "bucketaccess".) Click on the Entities Attached tab and then click on the Attach button and check the "vmimport" checkbox and click on the Attach Policy button.
Step 6: Create Storage BucketGo to your AWS Console and click on the S3 link (or type "S3" in Search to find it). Make sure you are in the Oregon region. Click on the Create Bucket button. In the General Information area, enter "USCNETID-usc-awsvm-us-west-2" as the Bucket Name (where USCNETID is your USC NetID). This name is required to be globally unique and that's why it needs to be such a long and specific name. Select "us-west-2" (or your region identifier) as the AWS Region. Keep all the default values and scroll all the way to the bottom of the page and click on the Create Bucket button. Please note that if you don't use the defulat values, you might end up using things that's not under the Free Tier and AWS may start charging your account right away.Now you are at the Buckets screen under S3. In the Buckets area, you should see your newly create bucket. Click on it to look at what's in this new bucket. Of course, the bucket should be empty. Click on the Upload button to get to the Upload screen. In the Files And Folders area, click on the Add Files button and select the "awsvnc32xu16047-vbox6140-f1.ova" file you have downloaded in Step 1 above. Scroll all the way to the bottom and click on the Upload button. If your upload speed is around 1 MB/sec, it will take about an hour for the upload to finish. When upload is finished, click on the Close button. In the Search box, type "CloudShell" and click on CloudShell in Services. If you get a screen saying that CloudShell is not available in the current region, you should choose your region. Step 7: Create AMI from Virtual ApplianceAMI stands for "Amazon Machine Image" and you need an AMI in order to launch a virtual machine instance.Go to your AWS Console and type "CloudShell" in the Search box on top and Click on CloudShell in Services. If your region is not Oregon, If you see that Region Unsupported screen, you need to choose a different region (e.g., US West (Oregon)). When you get the CloudShell prompt, you can type the following to see what command shell you are running and what OS you are running on: Then type the following to craete an AMI from the bucket you have created in Step 6 (please replace USCNETID with your USC NetID):echo $SHELL uname -a cat /etc/os-release
Press <ENTER> to execute the above command.
If you see an error message saying that the "S3 bucket does not exist", then you are probably in the wrong region.
This "import-image" command runs in the background and it can take a while to finish. To monitor the progress of this command, type:
To list all the "import-image" tasks, do:aws ec2 describe-import-image-tasks --import-task-ids ImportTaskId where ImportTaskId is the ImportTaskId in the printout of the "import-image" command. Look for the "Progress" line and the "Status" line. When the "Status" is "completed" (and the "Progress" line has disappeared), your AMI is ready to use.aws ec2 describe-import-image-tasks Step 8: Create Virtual Machine Instance From AMIGo to your AWS Console and type "EC2" in the Search box on top and Click on EC2 in Services. Make sure you are in the Oregon region. Click on Instances in the left panel then click on the Launch Instances button in the right panel. In Name, enter "awsvnc32xu16047-vbox6140-f1". In the Application and OS Images area, click on the My AMIs link/tab. There should be only one AMI and it should be selected already. In the Instance Type area, please use the default instance type (which should be "t2.micro"). This instance type has 1 CPU and 1 GB of RAM and that should be plenty to your assignments! Please don't select another choice because that that can be a lot more costly. In the Key Pair (Login) area, choose "Proceed Without A Key Pair (Not Recommended)". (If you want to ssh into this virtual machine instance as the superuser, then you need to create a key pair. Since we will be ssh into the "student" user account, you don't need to create a key pair.) Keep all the other default values, scroll all the way to the bottom of the page and click on the Launch Instance button. Please note that if you don't use the defulat values, you might end up using things that's not under the Free Tier and AWS may start charging your account right away.Once the virtual machine instance has been created successfully, you can click on the Create Billing Alerts button just in case you over-use your VM. It's a good idea to do this. Check all the checkboxes and provide your email to receive the alerts and click on the Save Preferences button. You will get a warning message saying that if you disable credit sharing, it may increase your monthly bill. Since this is a free account for a year, it should be fine to just click on the Save button and proceed. Please remember, you should only use this account to do your programming assignments. Go back to your EC2 console (i.e., go to AWS Console and type "EC2" in the Search box on top and Click on EC2 in Services). Make sure you are in the Oregon region and click on Instances in the left panel. In the Instance State column, it should say that your VM is in the Running state. (If your VM is not running, you can check the checkbox on the left of your VM and click on Instance State button on top and select State Instance.) Click on the virtual machine instance link in the Instance ID column. Look for the Public IPv4 DNS and what you see is the host name of your virtual machine instance. Please note that every time you restart your virtual machine instance, you may get a new Public IPv4 DNS host name. Let HOSTNAME be the Public IPv4 DNS host name of your virtual machine instance. Let's ssh into your VM for the first time and change your password there. Run Windows PowerShell if you are on Windows 10/11 or run Terminal if you are on Mac OS X. Then type:
ssh student@HOSTNAME
Type "yes" to continue. Enter your default password ("student").
VERY IMPORTANT: change your password now by typing:
passwd
It will prompt you for the current password, then it will ask you to enter your new password and then confirm the password.
Don't log out yet, you will have to come back here to do more set up.
Step 9: Setup And Run VNC Server On Your Virtual Machine InstanceThis step is idential to Step 6 of the regular installation procedure (for the Oregon region).Step 10: Connect Your Laptop To Your Virtual Machine InstanceThis step is idential to Step 7 of the regular installation procedure (for the Oregon region).
AWS Free Tier is free for 12 months but with limitations.
If you go to the AWS Free Tier website and click on "12 months free", you can see the limitations.
But these limitations are difficult to keep track. If you go beyond the usage caps, AWS will start charging your credit card!
So, you need to know how much resources you have been using.
Go to your AWS Console and click on your account name in the right-top corner and select Account. In the left panel, click on Bills to see if you have any charges (it should be $0.00). In the left panel, click on Free Tier to see your current Free Tier usage. It's probably a good idea to check this once a day to make sure that you are not over-using your account. Here are things you should do to minimize usage.
If you have made a mistake when you install a virtual machine (i.e., an EC2 instance), you should delete the EC2 instance
or AWS may charge you for using too much storage. Here are the steps you need to take to delete an EC2 instance.
|