|
The AWS (Amazon Web Services) has a Free Tier where you can get
an account for one year for free with limited functionalities and usage caps. Luckily, it's enough to install
a standard 32-bit Ubuntu 16.04 that we need to do our assignments.
Many thanks to the following Spring 2023 CS 402 students for giving me pointers to get this all figure out: Adam Pryor, Rulin Xing, and Kevin Kang. Links to sections on this page:
Here are the steps to create a standard 32-bit Ubuntu 16.04 system on AWS:
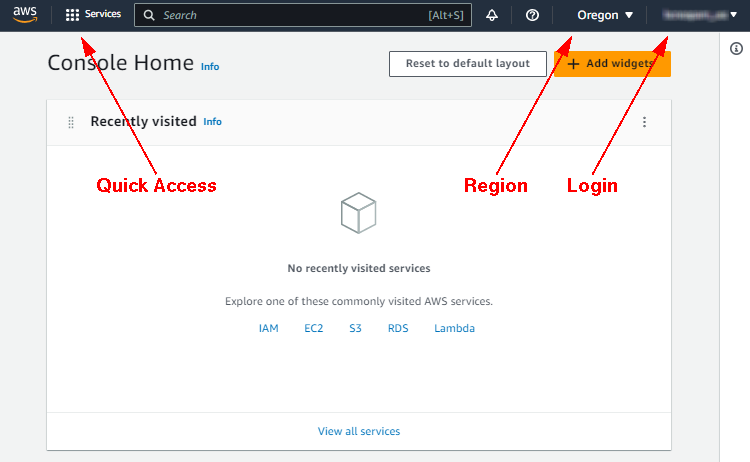
Step 1: Create An AWS AccountGo to AWS Free Tier and click on the Create a Free Account button. Click on the Create a New AWS account button and it will take you to the Sign Up For AWS screen. In the Root User Email Address box, enter your USC email address, and in the AWS Account Name box, enter an account name (I would recommend that you use "USCNETID_usc" as your account name, where USCNETID is your USC NetID). Click on Verify Email Address and follow the instructions there to finish setting up your AWS account.There are 5 steps to finish setting up your AWS account. In step 1, you will create your AWS password for logging in with the Root User Email address. In steps 3 and 4, you are required to provide a credit card number and a cellphone number (for the purpose of verification). AWS will not charge your credit card if you just use the system to do your assignments (unless you go over the Free Tier usage limit). This account is free for one year. You should set up a calendar reminder to delete this account before your one year anniversay. In step 5, please select Basic Support (Free). When you have finished creating your account, click on the Go To AWS Management Console button and proceed to the next step below. Step 2: Go To Your AWS ConsoleGo to your AWS (Management) Console. If you got logged out, you will see the Sign In screen. Click on the "Sign In Using Root User Email" button. Then select Root User and in the Root User Email Address, enter your account name you have created in Step 1 above, then click on the Next button. Enter your AWS password and click on the Sign In button to log in and you should see the following screen:Even though you are in southern California, the best choice for your region is probably the Oregon region (also known as the "us-west-2" region, and it's shown as the current region in the above image). The N. California region (also known as the "us-west-1" region) is heavily utilized and some resources may not be available at all time and it can be very frustrating to use. So, please select the "us-west-2" region. Please note that the instructions presented here will not work if you choose a different region. If you have to use a different region, please follow the installation procedure with your own copy of my virtual appliance. In the above image, to the right of Oregon is your account information. Click on it to see your AWS Account ID. You need to send an e-mail to the instructor now and ask him to "share an AMI" with you so that you can use it in Step 5 below. In your e-mail, please let him know your AWS Account ID. In the Recently Visited area, there are two important links. IAM stands for "Identity and Access Management" and it provides access permissions. EC2 is for creating and managing virtual machine instances. Step 3: Create IAM User Account/OrganizationGo to the IAM Identity Center. Make sure you are in the Oregon region. Click on the Enable button in the Enable IAM Identity Center area. (The purpose of the IAM Identity Center is to provide Single Sign-on.) You will be prompted to create an AWS organization (i.e., single sign-on for your entire organization). Click on the Create AWS Organization button. If you are taken back to the previous screen, just click on the Enable button in the Enable IAM Identity Center area again. If you get an error message saying something about "rate exceeded", please just reload the page and try again.You will get a popup window asking you to configure IAM Identity Center in your AWS environment. Keep the default (which is Enable With AWS Organizations) and click Continue. Please note that AWS Organizations supports IAM Identity Center in only one AWS Region at a time. If you are in the wrong region, you will see a link that would let you "delete the current IAM Identity Center configuration" in the region. Click on that link to delete the configuration. (Another way to get to the same place is to go to the IAM Identity Center and click on Settings on in left panel.) Click on the Management tab/link then click on the Delete button in the Delete IAM Identity Center Configuration area. In the next screen, check all the checkboxes and copy and paste the IAM Identity Center instance string into the text box and click on Confirm. After you have deleted your IAM Identity Center Configuration, you need to go back to the IAM Identity Center and Enable IAM Identity Center again. Step 4: Create IAM Service RolesNow you need to create some access permissions. Go to the IAM Dashboard and click on Roles in the left panel. This is done in the Global region (and you cannot select the Oregon region here). So, this is fine. In the right panel, you should see the AWSServiceRoleForOrganizations and the AWSServiceRoleForSSO roles. If you don't, you have to go back to the beginning of Step 3 and try again.Click on the Create Role button in the right panel. Select Custom Trust Policy in the Trusted Entity Type area. Delete all the code in the Create Trust Policy area and replace it with the following text:
Scroll all the way to the bottom of the page and click on the Next button.
On the next screen, just scroll all the way to the bottom of the page and click on the Next button.
Enter "vmimport" as Role Name and enter "My vmimport" in Description and scroll all the way to the bottom and click on the Create Role button.
This will allow you to import virtual machines.
Step 5: Create Virtual Machine Instance From Imported AMIAMI stands for "Amazon Machine Image" and you need an AMI in order to launch a virtual machine instance. Here, you need the AMI the instructor has shared with you.Go to your AWS Console and type "EC2" in the Search box on top and Click on EC2 in Services. Make sure you are in the Oregon region. Click on Instances in the left panel then click on the Launch Instances button in the right panel. In Name, enter "awsvnc32xu16047-vbox6140-f1". In the Application and OS Images area, if there is no My AMIs link/tab, click on the Browse More AMIs link. On the Choose an Amazon Machine Image (AMI) screen, click on the My AMIs link/tab and check the Shared With Me checkbox in the Refine Results area on the left and you should see that in the right panel, there is an AMI named "import-ami-e6ba62a0642768b5t" with ID (in smaller font) "ami-0fee776728ea1493a". Click on the Select button. (If this AMI is not available, either you are in the wrong region, or the instructor hasn't shared the AMI with you and you need to send an e-mail to the instructor and wait for confirmation before proceeding.) In the Instance Type area, please use the default instance type (which should be "t2.micro"). This instance type has 1 CPU and 1 GB of RAM and that should be plenty to your assignments! Please don't select another choice because that can be a lot more costly. In the Key Pair (Login) area, choose "Proceed Without A Key Pair (Not Recommended)". (If you want to ssh into this virtual machine instance as the superuser, then you need to create a key pair. Since we will be ssh into the "student" user account, you don't need to create a key pair.) Keep all the other default values, scroll all the way to the bottom of the page and click on the Launch Instance button. Please note that if you don't use the defulat values, you might end up using things that's not under the Free Tier and AWS may start charging your account right away. Once the virtual machine instance has been created successfully, you can click on the Create Billing Alerts button just in case you over-use your VM. It's a good idea to do this. Edit "Invoice Delivery Preferences" to PDF Invoices Delievered By Email and click on the Update button. Edit "Alert Preferences" and check all checkboxes and click on the Update button. I don't know what other alerts are for. You should probably read them and see if you would like them to be turned on. Check all the checkboxes and provide your email to receive the alerts and click on the Save Preferences button. You will get a warning message saying that if you disable credit sharing, it may increase your monthly bill. Since this is a free account for a year, it should be fine to just click on the Save button and proceed. Please remember, you should only use this account to do your programming assignments and not use it for anything else so that you won't get billed for additional expenses. Go back to your EC2 console (i.e., go to AWS Console and type "EC2" in the Search box on top and Click on EC2 in Services). Make sure you are in the Oregon region and click on Instances in the left panel. In the Instance State column, it should say that your VM is in the Running state. (If your VM is not running, you can check the checkbox on the left of your VM and click on Instance State button on top and select State Instance.) Click on the virtual machine instance link in the Instance ID column. Look for the Public IPv4 DNS and what you see is the host name of your virtual machine instance. Please note that every time you reboot your virtual machine instance, you may get a new Public IPv4 DNS host name. Let HOSTNAME be the Public IPv4 DNS host name of your virtual machine instance. Let's ssh into your VM for the first time and change your password there. Run Windows PowerShell if you are on Windows 10/11 or run Terminal if you are on Mac OS X. Then type:
ssh student@HOSTNAME
Type "yes" to continue. Enter your default password ("student").
VERY IMPORTANT: change your password now by typing:
passwd
It will prompt you for the current password, then it will ask you to enter your new password and then confirm the password.
If you don't change your default password, your account will be hacked! So, make sure you change your password now!
Don't log out yet, you will have to come back here to do more set up.
Step 6: Configure Firewall And Run VNC Server On Your Virtual Machine InstanceGo back to your EC2 console (i.e., go to AWS Console and type "EC2" in the Search box on top and Click on EC2 in Services). Make sure you are in the Oregon region. Click on Instances in the left panel then click on your instance in the right panel. In the middle of the right panel, click on the Security tab and scroll down and look for the Security Groups section. In that section, there should be a link labeled "sg-??? (launch-wizard-#)" where ??? is a long sequence of numbers and # is a small number. Click on that link to launch the wizard in the next screen. In Inbound Rules tab, click on the Edit Inbound Rules button. On the next screen, click on the Add Rule button. In the new row, enter 5901 as the Port Range. Click in the search box to the right of the Source column and select "0.0.0.0/0". Click on the Add Rule button again. In the new row, also enter 5901 as the Port Range. Click in the search box to the right of the Source column and select "::/0". Click on the Save Rules button at the bottom of the screen. Now you have opened the TCP port to your VNC server which you will configure. You can use other port numbers if you'd like. For this rest of this document, we will assume that the TCP port number you will use to connect to your VNC server is 5901.Continue from the end of Step 5 above, type the following into the commandline interface of your virtual machine instance to see what VNC-related "aliases" have been set up for you:
alias | grep vnc
and you should see the you have the following aliasses:
    alias killvnc='vncserver -kill :1'
    alias startvnc1='vncserver -geometry 1920x1080 :1'
    alias startvnc2='vncserver -geometry 1440x900 :1'
    alias startvnc3='vncserver -geometry 1366x768 :1'
    alias startvnc4='vncserver -geometry 1280x800 :1'
    alias startvnc5='vncserver -geometry 1024x768 :1'
The "killvnc" alias is to kill your VNC server. The five "startvnc" aliases
can be used to launch your VNC server with different display/desktop sizes.
Eventually, you need to figure out which one is best for you. For now, let's try the medium size desktop (1366x768) and do:
startvnc3
Since you haven't set up a password for remote access, it will prompt you to set up a password.
You should use the same password as the ssh password you use to ssh into your virtual machine instance.
If you see a messsage saying that your password is too long, just ignore it.
Now your VNC server should be running.
To kill the VNC server, you can just type:
killvnc
I have noticed that sometimes, the VNC server would all of a sudden stop to respond (I think this happens at least once every day).
All you need to do is to ssh to your server instance and kill the VNC server and restart it:
killvnc; sleep 3; startvnc3
Step 7: Connect Your Laptop To Your Virtual Machine InstanceYou should be able to use any VNC Viewer to connect to your virtual machine instance. I have heard good things about the VNC Viewer. Please just download and install the viewer since it's free. Please don't install the server+client package because that's not free. Also, there is no need to sign up for an account since you just want to use the viewer for free.After you've got it installed, launch the app and select New Connection from the File Menu. Enter the Public IPv4 DNS host name of your virtual machine instance (see Step 6 above) followed by ":5901" as the VNC Server and enter "AWS" as Name. Click on the OK button. This will create an icon in the viewer. Double-click on the icon and it will connect to your VNC server. When you are prompted for a password, please enter the password you have just set up, check the Remember Password checkbox, and click on the OK button and you will see your virtual machine desktop. Please note that you can run Sublime Text and Firefox! But VS Code will crash. When you see the desktop of your AWS instance, start a terminal by clicking on the terminal icon on the left side (or you can ssh into the AWS instance). Type "df" into the terminal and it should look like the following (may not look exactly the same):
    Filesystem     1K-blocks    Used Available Use% Mounted on
    udev              483952       0    483952   0% /dev
    tmpfs             102124   10428     91696  11% /run
    /dev/xvda1       8153724 6243452   1472104  81% /
    tmpfs             510612     256    510356   1% /dev/shm
    tmpfs               5120       0      5120   0% /run/lock
    tmpfs             510612       0    510612   0% /sys/fs/cgroup
    tmpfs             102124      44    102080   1% /run/user/1000
Pay special attention to the highlighted line above. It tells you how much of the root file system is being used. Right now, it says that 81% of the root file system is used.
If this number gets to be near 100%, your AWS instance will not work properly and you will have to delete some files to decrease the usage.
So, please don't install any software into your AWS instances that's not related to this class.
Also, type "top" into the terminal and the first few lines should look something like the following (may not look exactly the same):
    top - 18:32:28 up  3:35,  2 users,  load average: 0.00, 0.00, 0.00
    Tasks: 207 total,   1 running, 177 sleeping,   0 stopped,   0 zombie
    %Cpu(s):  2.1 us,  0.6 sy,  0.0 ni, 88.4 id,  0.0 wa,  0.0 hi,  0.3 si,  8.5 st
    KiB Mem :  1021224 total,    92260 free,   448344 used,   480620 buff/cache
    KiB Swap:   998396 total,   994300 free,     4096 used.   390704 avail Mem
    ...
The last two lines above are most important. The KiB Mem line tells you that your instance have 1GB of RAM and 92MB is free/available (i.e., less than 10%).
The KiB Swap line tells you that you have a little less thatn 1GB of "swap space" and pretty much all of it is free/available.
When the free swap space gets low, your AWS instance can slow to a halt and you will have to reboot your instance.
Type "q" on your keyboard to quit the "top" program. On the Mac, it has something called Screen Sharing, which is basically a VNC viewer (although I was told that it doesn't map the <Option> key to <Alt>). Let HOSTNAME be the Public IPv4 DNS host name of your virtual machine instance (see Step 6 above). To use Screen Sharing, first click on the Go menu and select Connect To Server. Then enter:
vnc://HOSTNAME:5901
Click on the Connect button and enter the password you have set up. Then search your laptop for the Screen Sharing app then launch it.
In the popup window, enter:
HOSTNAME:5901
then click on the Connect button to see your virtual machine desktop.
On Windows 10/11, there is a free VNC client/viewer called Remote Ripple which I like. Click on the Download button and follow the instructions to get it installed. (Please do not download the TightVNC server since we already have a VNC server running inside the virtual machine.) Launch the Remote Ripple app. Click on New Session. In the popup window, enter the Public IPv4 DNS host name of your virtual machine instance (see Step 6 above) as Host Address, AWS as Display Name, and click on Advanced Settings and enter 5901 as Port. Click on the Connect button. When you are prompted for a password, please enter the password you have just set up. Another free VNC client/viewer on Windows that I like is called UltraVNC. I don't recommend downloading UltraVNC from the UltraVNC website directly because it's difficult to download what you need without downloading a lot of other garbage! Instread, please visit this 3rd party website (at techspot.com). On the right, click on on the big Download Now button and click on the "Windows" button (and not the "Windows 32-bit" button) under Download Options to download a 64-bit installer. Wait 5 seconds and don't click on anything and the installer download should start. Uncheck the UltraVNC server and repeater and only install the viewer. When you run UltraVNC Viewer, under "server:port", enter:
HOSTNAME:5901
where HOSTNAME is the Public IPv4 DNS host name of your virtual machine instance and click on the Connection button to see your virtual machine desktop.
To transfer files between your laptop and the VM, I would recommend that you use FileZilla since it's pretty easy to use. This way, you can edit your files with your favorite editor on your laptop and use FileZilla to quickly copy your files to the VM. Another way to sync files is to use the git server inside your standard 32-bit Ubuntu 16.04 system. Here's an example of how to do it. Let's create a "git-repos" directory inside your home directory so that we can create subdirectories there, one for each of your git repository: Another way to transfer file is to use the scp commandline program. From Windows Powershell or Mac Terminal, you can type the following to scp FILE1 in the current working directory of the PowerShell/Terminal to the home directory of your virtual machine instance:
scp FILE1 student@HOSTNAME:FILE1
To scp FILE2 from the home directory of your virtual machine instance to the current working directory of your PowerShell/Terminal, do:
scp student@HOSTNAME:FILE2 FILE2
AWS Free Tier is free for 12 months but with limitations.
If you go to the AWS Free Tier website and click on "12 months free", you can see the limitations.
But these limitations are difficult to keep track. If you go beyond the usage caps, AWS will start charging your credit card!
So, you need to know how much resources you have been using.
Go to your AWS Console and click on your account name in the right-top corner and select Account. In the left panel, click on Bills to see if you have any charges (it should be $0.00). In the left panel, click on Free Tier to see your current Free Tier usage. It's probably a good idea to check this once a day to make sure that you are not over-using your account. Here are things you should do to minimize usage.
Here are some common issues and how to deal with them:
If you have made a mistake when you install a virtual machine (i.e., an EC2 instance), you should delete the EC2 instance
or AWS may charge you for using too much storage. Here are the steps you need to take to delete an EC2 instance.
|