|
|
| |
|
|
| |
|
This web page is for installing Ubuntu Linux on Windows or Mac OS X
for general purpose. If you are installing Ubuntu Linux
for a specific class in order to do assignments, you should make sure
that you are installing the correct version of Ubuntu Linux
required by that class.
|
| |
|
Purpose
|
|
Here we give a simple procedure to install Ubuntu Linux on Windows 7/8
using WUBI
(and some not-so-simple procedure to install Ubuntu Linux on Mac OS X).
Two great things about the WUBI installation are that (1) it's trivial to uninstall
it, and (2) it does not need a harddrive partition of its own. You can install
Ubuntu Linux even into your Windows machine's C: drive! You do need at least
8 GB of free disk space (more space is preferred if you plan to use Ubuntu Linux for a long time).
You can also install Ubuntu Linux on an Intel-based machine
running Mac OS X. In order to do that, you need to
first create a hard disk partition to hold Ubuntu Linux
before installing it. Please see the instructions below.
After you have finished installation and are able to run Ubuntu Linux,
you can continue with using the Ubuntu Desktop.
I don't have a Chromebook, so I don't know if it's easy to install Ubuntu Linux on it. Please check the
ChrUbuntu web page
and let me know if it works for you.
If you are looking to buy a new machine but you have a limitted budget (around $250),
please see my notes below.
|
| |
|
Download and Install Ubuntu Linux on Windows 7/8
|
|
If you have an older laptop or desktop machine running Windows 7 (or even Windows 8) and it's too slow to run
Ubuntu inside a virtual machine such as VirtualBox or VMware Player, then the easiest way to get Ubuntu Linux
running reasonable well is to download and install Ubuntu using Windows Ubuntu Installer (WUBI).
This guide will assume that you will use WUBI to install Ubuntu Linux.
Visit the
Windows Ubuntu Installer (WUBI) web page
and click on the big
Start Download button and run the downloaded wubi.exe program to
install the latest Ubuntu. Or, If you are installing Ubuntu to do the kernel assignments in CS 402,
you should NOT use the latest version of Ubuntu.
You should visit the Ubuntu 12.04 (Precise Pangolin)
download site, scroll all the way to the bottom and click on wubi.exe.
Either way, you will get a screen that looks like the following:
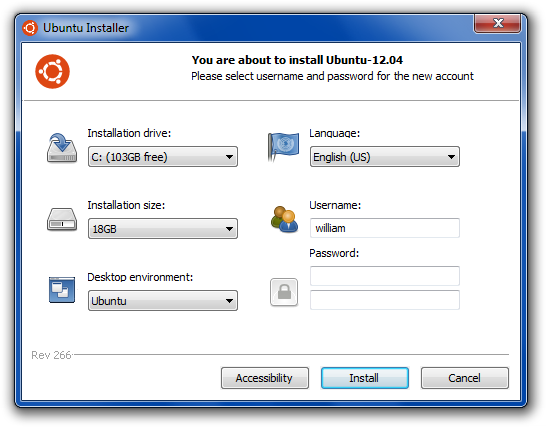
Set the Installation Size to be at least 12 GB, set the Username
to the same as your nunki/aludra.usc.edu loginname, and enter
your password (it does not have to be the same as your
nunki/aludra password) and confirms it. Then click on
the Install button. Part of the installation process is
done on Windows (and it would take a while for this to finish).
When that's done, you will see the following screen:
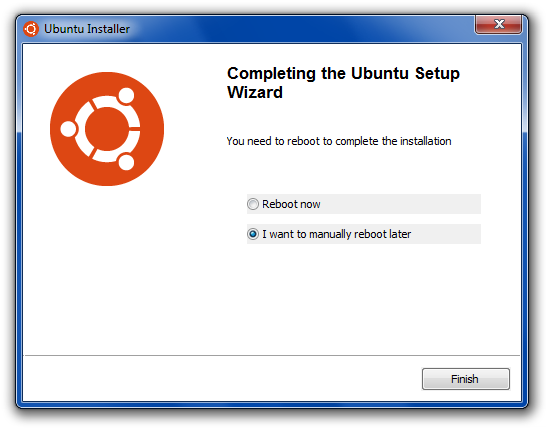
Select Reboot Now and click Finish to reboot your machine.
At this time, your machine will be booting Ubuntu Linux to finish
the installation process. A few minutes later, you will be prompted
with a login screen. Select your loginname and enter your password
and your desktop would be running on top of Ubuntu Linux! If this
is your desktop machine, Ubuntu Linux may have automatically detected
your printer (and may be other devices). In this case, you may get
a window on your desktop asking if you would like to install a
printer driver for your printer. Please read the on-screen instructions
and decide which way you would like to proceed.
By default, you are an administrator on your machine. Any time
you get a popup box asking for administrator password, just type in
your Ubuntu Linux login password for your account.
From now on, if you reboot your machine, as your machine comes up, you will be
asked to choose between Windows 7/8 and Ubuntu. Just use your keyboard's up and
down arrow keys to select what you would like to run. If you don't do anything,
Windows 7/8 is selected and will be started. If you would like to run
Ubuntu Linux, you need to selected Ubuntu and press the <ENTER> key.
To remove Ubuntu Linux, simply boot into Windows 7/8, run Control Panel
and select Programs and Features. Click on Ubuntu to uninstall it.
After you have done this, your machine will just boot straight into
Windows 7/8.
|
| |
|
Ubuntu Desktop
|
On your Ubuntu desktop, there are a bunch of buttons on the left. This is the
Laucher area. It's like the Dock on Mac OS X. Here's a brief explanations
of the functionalities of these buttons in the Launcher.
 |
This button allows you to search for a program on your machine
and run it. If you simply press the <ALT> key (or the
Windows key, if you have a Windows keyboard) on your keyboard,
it would be the same as pressing this button.
Try this... Click on it and type "Terminal" and click on the
Terminal icon to run
the gnome-terminal program. A Terminal button will be added temporarily
to your Launcher. Right-click on that button and select Lock to Laucher since you
would most likely use the gnome-terminal to ssh to
nunki/aludra.usc.edu. The gnome-terminal program can have
multiple tabs. You can press <Cntrl+Shift+t> to add a tab and press <Cntrl+PageUp/Dn>
to circulate between tabs. Select Set Title from the Terminal menu to give each tab a title can
also be quite useful.
|
 |
This lauches your filesystem viewer (similar to File Explorer
on Windows or Finder on Mac OS X).
|  |
This lauches the Firefox web browser.
|  |
This lauches the LibreOffice Writer program. It's quite
compatible with Microsoft Word. It can read and write .doc, .docx,
and .rtf files.
|  |
This lauches the LibreOffice Calc program. It's quite
compatible with Microsoft Excel. It can read and write .xls, .xlsx,
and .csv files.
|  |
This lauches the LibreOffice Impress program. It's quite
compatible with Microsoft PowerPoint. It can read and write .ppt and
.pptx files.
|  |
This lauches the
Software Center whenere you can download and install additional software
onto your machine (kind of like an App Store). In addition, it can also
show you what programs are installed on your machine and let you uninstall them.
If you use Adobe Photoshop a lot, the free software that comes closest to the
functionality of Adobe Photoshop is probably the "gimp" program. Launch
the Software Center and type "gimp". The rest should be easy to figure out.
Sometimes, the Software Center popups by itself if you are installing something
in Firefox. For example, if you go to "www.youtube.com" with Firefox,
you should see that a plugin (to play Adobe Flash) is missing. If you proceed to
install the plugin on Firefox, you will see that the Software Center is needed to
finish the installation.
|  |
This lauches the Ubuntu One client program.
Ubuntu One is free and you can use it as your
"personal cloud".
A free subscription
will get you 5 GB of free storage space in the cloud and you can sync-up any
directories in your account with the Ubuntu One cloud drive. This way,
all your development work gets backed up automatically (this is probably a good
reason to use this free service). Also, if you have multiple
machines all running Ubuntu Linux, you can sync them up through the cloud drive.
To get this set up, you should first create an account on
one.ubuntu.com and launch the Ubuntu One
client program. The client program will create an Ubuntu One folder in
your home directory and you should put all your development work under it.
When the client program is asking you to choose which folder you would
like to sync to the cloud, check the Ubuntu One folder. You may include
other directories such as Music and Pictures, if you'd like.
|  |
This lauches the System Settings program (similar to
Control Panel on Windows and System Preferences on Mac OS X).
|  |
This lets you switch workspaces (not the same as desktops).
By default, you get four workspaces. After you click this button, double-click which
workspace you want to work in. This is pretty useful if you are running too many
applications all at once.
|
|
| |
|
Install More Software
|
|
Many software on Ubuntu Linux are free, although they may not be
installed by default. You can use the Software Center
to install more software. Alternately, you can install them over the commandline using
the Terminal (i.e., gnome-terminal) program, if you
know the precise names of the software packages.
Here's my list of must-haves for developing C++ and Java programs and for viewing PDF files:
- g++
- javac
- java plugin (for web browsers)
- acroread
To download and install them, first, start an instance of Terminal.
Then enter the following command:
sudo apt-get install g++
The apt-get is the program for downloading and installing
a piece of software. But only administrator can install software.
Although you are an administrator on your own machine, you do not run at the
administrator privilege level normally. The sudo command is
used to temporarily raise you security privilege to the level of an
administrator in order to execute the rest of the command you typed into the
commandline (in this example, that is "apt-get install g++").
Therefore, when you run the above command, you will be prompted to enter your
password before the rest of the command can be executed. The good news is
that if you run the sudo command subsequently in the same console,
you will not be prompted to enter your password, unless your console has been
idle for a long time.
Software came from Software Repositories (also known as Software Sources). Ubuntu uses
a couple of default repositories. Some software, such as Adobe's acroread
program, are on Ubuntu partner's repositories. To include Adobe's repository,
you need to start the Software Center, select
Software Sources from the Edit Menu, click on the Other Software tab, and click
on the Add button. Copy and paste the following line into the textfield where it
asks for an "APT Line":
deb http://archive.canonical.com/ natty partner
Then go to your Terminal and enter:
sudo apt-get update
to connect to the newly incorporated repository. At this point, you can
download and install all the software mentioned previously by doing:
    sudo apt-get install g++
    sudo apt-get install openjdk-6-jdk
    sudo apt-get install icedtea6-plugin
    sudo apt-get install acroread
Please note that when you run apt-get from the commandline, it often
asks you to confirm that you really want to install the software you asked
for. This means that you cannot run a bunch of these commands in a script
easily.
Please also note that you can only run one instance of apt-get at a time.
Internally, the Software Center also
invokes apt-get to download and install software. So, if the Software Center
is busy installing a program, you will be blocked from running apt-get
until the Software Center is finished.
|
| |
|
Download and Install Ubuntu Linux on Mac OS X
|
|
If you have an Intel-based Mac machine (running Mac OS X) and you
don't have Windows installed on it, you need to first create a hard disk
partition to hold the Linux OS before you can install Ubuntu Linux.
To check if you have an Intel-based Mac machine, click on the Apple logo,
select About This Mac, and click on More Info. If the "Processor Name"
starts with "Intel", then you have an Intel machine.
To create a hard disk partition, start a new Finder window, select
Applications, scroll all the way to the bottom and select Utilities,
then double-click on Disk Utility to run it. In Disk Utility,
click on your main hard drive and click on the Partition button in the
right pane. Your main hard drive partition should be selected
automatically and its attributes shown in the right pane.
In the Size field in the right pane, it should be
showing the size of your main hard drive partition. Reduce that number by
16 GB (since we want to reserve 16 GB for Linux). Once you have enter
the new size, press the <TAB> key to tab out of that field.
You should see that the graphic will show that the partition size has
been reduced. Click on Apply and this will shrink the size
of the main partition by 16 GB. You will be prompted to confirm that
you want to re-partition your hard drive. If everything looks good,
click on the Partition button in the popup window to confirm.
It should take a minute or two for the Mac to verify that the updated
partition is intact.
The above procedure opens up 16 GB on your hard drive so that you can
install Ubuntu Linux into this open space. Just leave it open and
Ubuntu Linux will know what to do with it!
Download Ubuntu Linux & Create CD/DVD
The next thing is to download Ubuntu Linux and create a bootable CD/DVD.
Visit the
Ubuntu Desktop Download web page,
select whether you want the 32-bit or 64-bit version of
Ubuntu Linux (most likely, you would need the 64-bit
version, especially if you have tried the 32-bit version
and got an error), and click on the big Start Download button.
We will use the 64-bit version of Ubuntu Linux as an example here.
Save ubuntu-12.04-desktop-amd64.iso on your hard drive.
It will probably take a long time to finish downloading this file.
When you are done, open a Finder window so that you can see the
downloaded ubuntu-12.04-desktop-amd64.iso file.
Open Disk Utility. Drag
ubuntu-12.04-desktop-amd64.iso from the Finder window into
the left pane of Disk Utility and put it below your hard drive.
Put a blank CD or DVD into your CD/DVD-RW drive.
Click on ubuntu-12.04-desktop-amd64.iso in the left pane
of Disk Utility and click on Burn in the right pane to create
a bootable CD/DVD. Please note that the created CD/DVD can be
used on both Windows and your Mac since they are all Intel-based
machines!
Installing Ubuntu Linux
IMPORTANT:
I strongly recommend that you plug your Mac into a wired
network! It's the best way to ensure that everything get installed
properly! (If you only have a wireless connection, during the
installation process, you will be prompted to choose a wireless
connection. Make sure you select it. In this case, I'm not sure if
everything will get installed properly. Although I think most of the
stuff should work fine.)
Restart your machine with the installation CD/DVD in the drive. Hold
down the C key as your machine restarts to boot your machine
from the installation CD/DVD. (You may have to hold down the C key
for quite a while. You can let go the C key when you see a dark
screen instead of the white screen with a grey Apple logo.)
Select "Install Ubuntu alongside Mac OS X". By default, the
slightly smaller than 16 GB drive will be selected. The installer
would partition the 16 GB partition into two partitions having
sizes shown on the screen. If you want to make the Linux
partition larger, you can drag the divider to the right. When you
have decided how large the Linux partition you want, you can click
on Connect to continue.
Dual Booting and Uninstall on Mac
When your Mac starts booting, hold
down the Options key as your machine restarts.
You may have to hold down the Options key
for quite a while. You can let go the Options key when you are
offered to choose between Mac and Windows. (Don't worry, you don't
have Windows.) You can press the <TAB> key to switch between
the two choices. Press <ENTER> when Windows is selected and you
will be booting into Ubuntu Linux.
There is really no need to uninstall Ubuntu Linux since it's invisible
on the Mac (unless you boot your machine and hold down Options).
If you really want to delete Ubuntu Linux and reclaim the disk space
occupied by Ubuntu Linux, you should contact the instructor.
|
| |
|
Low Cost Solution
|
|
[ DISCLAIMER: I cannot vouch for the quality or durability of these low end machines.
I have tried out the HP Stream 11 and it appears to work fine for me. Your experience may be different. ]
If you are thinking about buying a Chromebook to do CS 402 assignments because it's the cheapest
machine out there, don't do it until you have read this section! Chromebook is really not a
general purpose computer. Thanks to the new Intel CPU, you can buy a real computer for the same price (or cheaper)!
These days, you can buy an Intel Core i3 Windows 8.1 machine with 4GB of memory for
about $450. If you can afford a Core i5 with more memory, that would be even better.
But if you have a limited budget (say $250) and you are looking to buy a new machine
that can be used to do CS 402 kernel assignments, it may be tough to find such a
machine.
Luckily, Intel recently came up with the Celeron N2840 processor that can run at 2.16 GHz. It's slightly
slower than the Core i3 processor. But it's fast enough to be quite useful. HP
built a low-end machine around this processor and it's called the HP Stream. 11-inch
screen with 2GB memory is the most affordable model. Unfortunately, it has two downsides.
(1) It doesn't have a hard drive. It only has a 32GB SSD.
(2) It doesn't play nice with Linux because its Windows 8.1's secure boot refuses
to let you make this machine dual boot from its hard drive. After experimenting with this machine for a while,
I came up with a figuration that would work that boots from a USB drive. Here's the hardware that you need if you want to go with this approach:
(Disclaimer: I'm not affiliated with Amazon or any of these manufacturers. I'm using Amazon and others below for convenience.)
- HP Stream 11 -
Click on the "other buying options" to see that you can order it from Amazon for $199.99 with
free shipping.
(The 16GB Class 10 SDHC Memory Card -
This goes into the SD card slot on the side of the HP Stream. You can use this to share files
between Linux and Windows. This card is around $10. (Please note that the maximum SD card
supported by HP Stream 11 is 32GB.)
- 16GB USB Thumb Drive -
You would install Ubuntu Linux on this drive.
(But in order to put Ubuntu Linux on it, you need either an external CD/DVD drive or a 2nd thumb drive.
Using an external CD/DVD drive is the easiest. But if you do not have access to an external CD/DVD drive,
you can buy 2 of these USB Thumb Drive, and use one of them as a bootable external device.
You can also share one of these with your friends. Once you get Ubuntu Linux installed on one drive,
you don't need the other one any more.)
This thumb drive costs lessn than $7.
- Wieless USB Optional Mouse -
The left and right "mouse buttons" on the touchpad on the HP Stream 11 does not work under Ubuntu Linux. (May be it will get fixed
in newer version of Linux.)
You can just tap on the touchpad to simulate the "mouse buttons", but it's not too convenient. But if you get a wireless mouse,
you have to carry it around. So, it's a different kind of inconvenience. Anyway, you can try to live without a wireless mouse.
If you cannot, buying one would cost you $15.
The above configuration (with only one USB drive and without wireless mouse) costs $215 plus tax (make sure you select free shipping) for a total around $235.
Here are the steps you need to do after you have received all the items. I will assume that you got two USB drives.
- Put the hardware together - Install SD card and USB thumb drives. (At this time, there's no free USB slot to install mouse.)
- Configure hardware and OS - Setup Windows 8.1. Get a free Microsoft OneDrive account
and use it as your login. It comes with 15GB free cloud storage. You can use this to backup your programming assignments on a cloud drive.
- I would uninstall McAfee since Windows comes with something similar called Windows Defender. You can start File Explorer,
click on "Uninstall or change a program" near the right-top corner of the window, click on "McAfee LiveSafe - Internet Security",
check all the checkboxes, and click on "Remove". Restart the machine when this is done. Afterwards, start File Explorer,
click on "Open Control Panel" near the right-top corner of the window, in the right-top corner search box, type "Windows Defender" and press ENTER on your keyboard,
then click on "Windows Defender" to run it once and quit. From now on, you have "Windows Defender" running in the background.
- Create a swap partition in your USB thumb drive because Ubuntu needs a swap partition.
- Start File Explorer.
- In the left pane, right-click on "This PC" and select "Manage".
- In the "Computer Management" window, click on "Disk Management" in the left pane. This can take a few seconds.
- Right-click in the area that corresponds to your USB thumb drive and select "Delete Volume". (I'm assuming that this is a new thumb drive and has nothing on it.)
- Right-click in the area that corresponds to your USB thumb drive (it should say "Unallocated" at this point) and select "New Simple Volume".
Replace the value shown in the area where it asks you to enter the "Simple volume size in MB" by 2000. (For example, if it shows "15264", replace it with "13264".)
Click on the "Next" button keep clicking "Next" until finished.
- Right-click in the remaining area of your USB thumb drive (it should say "Unallocated" at this point) and select "New Simple Volume".
Use the entire 2GB for this volume. When you get to the "Assign Drive Letter or Path" screen, select the last option, "Do not assign a drive letter or drive path"
and click on "Next". In the next screen, select "Do not format this volume" and click on "Next". When you are done, you should see that the volume type of this volume is "RAW".
- Disable Secure Boot as follows:
- Move mouse pointer to right-top corner of screen and wait for a bunch of icons to appear on the right side of your window.
- Click on "Settings" near the bottom.
Click on "Change PC settings" near the bottom.
Click on "Update and recovery" on the left.
Click on "Recovery" on the left.
Click on the "Restart now" button on the right.
- Windows will quickly reboot.
- Click on "Troubleshoot".
Click on "Troubleshoot".
Click on "Advanced options".
Click on "UEFI Firmware Settings".
Click on the "Restart" button.
- Windows will reboot. When you see the "Startup Menu", press the F10 key on the keyboard for "BIOS Setup".
- Press the right-arrow key on the keyboard to move to "System Configuration".
Press the down-arrow key on the keyboard to move to "Boot Options".
Press the ENTER key on the keyboard.
Press the down-arrow key on the keyboard to move to "Legacy Support".
- Press the F6 key on the keyboard to move to enable "Legacy Support". You need to use the
left-arrow key or the right-arrow key on the keyboard to move between your choises and
press the ENTER key to accept your choice.
- Press the F10 key on the keyboard to "Save and Exit".
- You will be prompted with an "Operating System Boot Mode Change" screen. Please read it carefully.
It asks you to enter a 4-digit code followed by pressing the ENTER key to complete the change.
Go ahead and type the 4-digit code and press the ENTER key. (Nothing will be echoed on the screen.
So, make sure you press the right keys.)
- From now on, you will be using "Legacy Boot" (and "Secure Boot" has been bypassed). When you reboot,
keep an eye on the lower-left corner of the screen and you will see the text, "Press the ESC key for Startup Menu",
appears briefly. When you see that, if you press the ESC key on the keyboard a few times quickly, you will see
the "Startup Menu" again. You can press F9 to boot from a USB drive or press F10 to enter "BIOS Setup".
- Download the latest 64-bit Ubuntu 14.04 desktop from the Ubuntu 14.04 (Trusty Tahr) web site.
Save the downloaded .iso file in the Downloads directory.
(Please do not use Ubuntu 12.04 because it won't work on the HP Stream 11.)
- If you have an external CD/DVD drive, you can burn the Ubuntu 14.04 .iso file onto a CD/DVD, boot from it and install Ubuntu 14.04
on your USB thumb drive.
If you don't have an external CD/DVD drive, you can use a 2nd USB thumb drive, but you need to make it into a bootable USB thumb drive.
Here's what you can do:
- Start File Explorer. You should see that your SD card is drive D, your USB thumb drives are drives E and F.
- Download and install YUMI (scroll half-way down
and click on the large light-blue button that says "DOWNLOAD YUMI" on it). Don't install it yet.
Just download it because you may have to repeat this a few times to get it to work just right.
- The next step is to make your first USB thumb drive a multiboot drive. Click on the downloaded YUMI.exe
(the actual filename may include a version number). Do the following in YUMI:
- Click on "I Agree" to accept the licensing terms.
- Click on the drop-down menu in "Step 1". Select drive E.
- Click on the drop-down menu in "Step 2". Select "Ubuntu".
- Click on the "Brose" button in "Step 3", navigate to the folder when you have downloaded the Ubuntu .iso file and select the .iso file and click "Open".
- Click on the "Next" button and wait for things to be copied into the USB thumb drive. This can take a while.
- Reboot into the "Startup Menu". Press F9 to boot from a USB drive. Select the first USB thumb drive and press ENTER.
- You will see the YUMI Multiboot screen. Press the down-arrow key on the keyboard to move to "Linux Distributions" and press ENTER.
Press the down-arrow key on the keyboard to move to the desired Ubuntu Linux version (you may only have one) and press ENTER.
Press the down-arrow key on the keyboard to move to "Install Ubuntu" and press ENTER.
- At this point, the installation process is similar to installing Ubuntu Linux from a DVD on your machine. The main differences are noted here.
- Before you proceed with any of the installation steps, you should setup a wireless connection. Wait for your laptop to show that
a connection has been established before continuing.
- Select English and click on the "Continue" button. Check the "Download updates while installing" and "Install this third-party software" checkboxes, nd click "Continue".
- Now comes the tricky part. On the "Installation type" screen, select "something else" near the bottom and click on "Continue".
- Use the down-arrow key on the keyboard to scroll through the list of devices.
Scroll all the way down and look for a 2000MB "free space" on your USB thumb drive
(it's probably called "/dev/sda2" or "/dev/sdb2"). Select it and press ENTER.
In the popup window, select "swap area" in "Use as" and click "OK".
(Please note that if you don't this in a previous installation, then you don't have to do this step any more. The swap area will be automatically picked up by the installer.)
- Scroll all the way down again. The last device is probably "/dev/sdb1" or "/dev/sdc1". That's your SD card.
Right above it (probably "/dev/sda1" or "/dev/sdb1") is your other USB thumb drive. Select your USB thumb drive and press ENTER.
In the popup window, select "Ext4 journaling file system" in "Use as", check the "Format the partition" checkbox,
and type "/" (without the double-quotes) in the "Mount point" field. Click "OK" to close the popup window.
- Scroll all the way down again. Select your SD card and press ENTER.
In the popup window, select "FAT32 file system" in "Use as" and type "/sdcard" (without the double-quotes) in the "Mount point" field (do NOT format this partition).
Click "OK" to close the popup window.
- Finally, select "/dev/sda" or "/dev/sdb" (without the "1") in the "Device for boot loader installation" near the bottom.
- Click on "Install Now" and the installation will proceed.
- Select Los Angeles to be your timezone and click on "Continue".
- Select English and click on "Continue".
- Enter your name and come up with a random computer name. In the "username" field, I would recommend that you use the same login ID as your USC e-mail address (which is also
your login ID for nunki.usc.edu). This will make it a little easier when you have to ssh to nunki.usc.edu.
After you have entered everything you need, click "Continue" and wait for Ubuntu to be installed. This can take a long time.
- From this point on, every time you want to run Ubuntu Linux, you need to reboot into the "Startup Menu", press F9 to boot from a USB drive,
and select the USB thumb drive that has Ubuntu Linux installed and press ENTER.
- You can shutdown the machine, remove the first USB thumb drive and reboot again.
|
| |
|
Links Suggested by Students
|
Here are some links suggested by students (which I have not or could not verify).
If the other procedures described on this web page did not work, may be you
can give these links a try.
Windows 7/8:
Mac OS X:
Multiplatform:
- VirtualBox (this is a reliable way to get Ubuntu running on
your Mac Os X; this can be slower than other approaches, but if you have a fast Mac, doing it this way can save
you a lot of frustration)
Chromebook and Tablets:
- Chromebook and Tablets are not general purpose computers. They may be good for surfing the web and reading
e-mails. But they are not good choices for OS development.
|
| |
|