|
Notes on Installing Ubuntu Linux - |
||||||||||||||||||||
|
Here we give a simple procedure to install Ubuntu Linux on Windows 7.
One great thing about Ubuntu Linux is that it does not need a harddrive
partition of its own. You can install it into your Windows machine's C: drive!
You do need at least 8 GB of free disk space.
You can also install Ubuntu Linux on an Intel-based Mac machine running Mac OS X. In order to do that, you need to first create a hard disk partition to hold Ubuntu Linux before installing it. Please see the instructions below. After you have finished installation and are able to run Ubuntu Linux, you can continue with using the Ubuntu Desktop. I don't have a Chromebook, so I don't know if it's easy to install Ubuntu Linux on it. Please check the ChrUbuntu web page and let me know if it works for you. |
||||||||||||||||||||
| Links Suggested by Students | ||||||||||||||||||||
Here are some links suggested by students (which I have not or could not verify).
If the other procedures described on this web page did not work, may be you
can give these links a try.
Windows 8:
Windows 7:
Mac OS X:
Multiplatform:
Chromebook and Tablets:
|
||||||||||||||||||||
| Download and Install Ubuntu Linux on Windows 7 | ||||||||||||||||||||
|
If you have a Windows 7 laptop or desktop, the easiest way to get Ubuntu Linux
running is to download and install
Windows Ubuntu Installer (WUBI). This guide will
assume that you will use WUBI to install Ubuntu Linux.
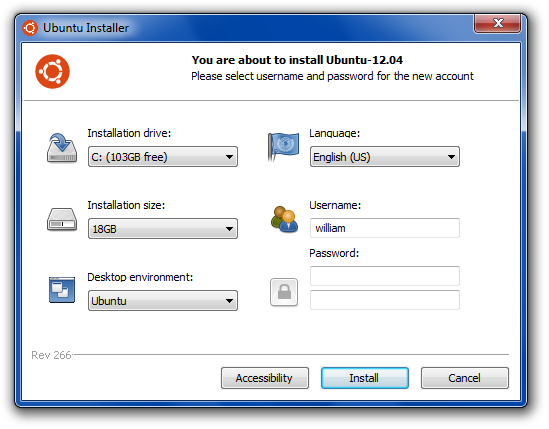
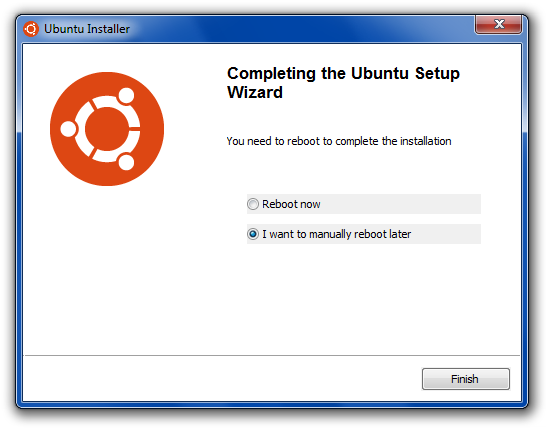
Visit the Windows Ubuntu Installer (WUBI) web page and click on the big Start Download button and run the downloaded wubi.exe program. You will get a screen that looks like the following: Set the Installation Size to be at least 12 GB, set the Username to the same as your nunki/aludra.usc.edu loginname, and enter your password (it does not have to be the same as your nunki/aludra password) and confirms it. Then click on the Install button. Part of the installation process is done on Windows (and it would take a while for this to finish). When that's done, you will see the following screen: Select Reboot Now and click Finish to reboot your machine. At this time, your machine will be booting Ubuntu Linux to finish the installation process. A few minutes later, you will be prompted with a login screen. Select your loginname and enter your password and your desktop would be running on top of Ubuntu Linux! If this is your desktop machine, Ubuntu Linux may have automatically detected your printer (and may be other devices). In this case, you may get a window on your desktop asking if you would like to install a printer driver for your printer. Please read the on-screen instructions and decide which way you would like to proceed. By default, you are an administrator on your machine. Any time you get a popup box asking for administrator password, just type in your Ubuntu Linux login password for your account. |
||||||||||||||||||||
| Dual Booting and Uninstall on Windows Machine | ||||||||||||||||||||
|
From now on, if you reboot your machine, as your machine comes up, you will be
asked to choose between Windows 7 and Ubuntu. Just use your keyboard's up and
down arrow keys to select what you would like to run. If you don't do anything,
Windows 7 is selected and will be started. If you would like to run
Ubuntu Linux, you need to selected Ubuntu and press the <ENTER> key.
To remove Ubuntu Linux, simply boot into Windows 7, run Control Panel and select Programs and Features. Click on Ubuntu to uninstall it. After you have done this, your machine will just boot straight into Windows 7. |
||||||||||||||||||||
| Ubuntu Desktop | ||||||||||||||||||||
On your Ubuntu desktop, there are a bunch of buttons on the left. This is the
Laucher area. It's like the Dock on Mac OS X. Here's a brief explanations
of the functionalities of these buttons in the Launcher.
|
||||||||||||||||||||
| Install More Software | ||||||||||||||||||||
|
Many software on Ubuntu Linux are free, although they may not be
installed by default. You can use the Software Center
to install more software. Alternately, you can install them over the commandline using
the Terminal (i.e., gnome-terminal) program, if you
know the precise names of the software packages.
Here's my list of must-haves for developing C++ and Java programs and for viewing PDF files:
sudo apt-get install g++
The apt-get is the program for downloading and installing
a piece of software. But only administrator can install software.
Although you are an administrator on your own machine, you do not run at the
administrator privilege level normally. The sudo command is
used to temporarily raise you security privilege to the level of an
administrator in order to execute the rest of the command you typed into the
commandline (in this example, that is "apt-get install g++").
Therefore, when you run the above command, you will be prompted to enter your
password before the rest of the command can be executed. The good news is
that if you run the sudo command subsequently in the same console,
you will not be prompted to enter your password, unless your console has been
idle for a long time.
Software came from Software Repositories (also known as Software Sources). Ubuntu uses a couple of default repositories. Some software, such as Adobe's acroread program, are on Ubuntu partner's repositories. To include Adobe's repository, you need to start the Software Center, select Software Sources from the Edit Menu, click on the Other Software tab, and click on the Add button. Copy and paste the following line into the textfield where it asks for an "APT Line":
deb http://archive.canonical.com/ natty partner
Then go to your Terminal and enter:
sudo apt-get update
to connect to the newly incorporated repository. At this point, you can
download and install all the software mentioned previously by doing:
    sudo apt-get install g++
    sudo apt-get install openjdk-6-jdk
    sudo apt-get install icedtea6-plugin
    sudo apt-get install acroread
Please note that when you run apt-get from the commandline, it often asks you to confirm that you really want to install the software you asked for. This means that you cannot run a bunch of these commands in a script easily. Please also note that you can only run one instance of apt-get at a time. Internally, the Software Center also invokes apt-get to download and install software. So, if the Software Center is busy installing a program, you will be blocked from running apt-get until the Software Center is finished. |
||||||||||||||||||||
| Download and Install Ubuntu Linux on Mac OS X | ||||||||||||||||||||
|
If you have an Intel-based Mac machine (running Mac OS X) and you
don't have Windows installed on it, you need to first create a hard disk
partition to hold the Linux OS before you can install Ubuntu Linux.
To check if you have an Intel-based Mac machine, click on the Apple logo, select About This Mac, and click on More Info. If the "Processor Name" starts with "Intel", then you have an Intel machine. Partition Your Mac Hard DriveTo create a hard disk partition, start a new Finder window, select Applications, scroll all the way to the bottom and select Utilities, then double-click on Disk Utility to run it. In Disk Utility, click on your main hard drive and click on the Partition button in the right pane. Your main hard drive partition should be selected automatically and its attributes shown in the right pane. In the Size field in the right pane, it should be showing the size of your main hard drive partition. Reduce that number by 16 GB (since we want to reserve 16 GB for Linux). Once you have enter the new size, press the <TAB> key to tab out of that field. You should see that the graphic will show that the partition size has been reduced. Click on Apply and this will shrink the size of the main partition by 16 GB. You will be prompted to confirm that you want to re-partition your hard drive. If everything looks good, click on the Partition button in the popup window to confirm. It should take a minute or two for the Mac to verify that the updated partition is intact. Download Ubuntu Linux & Create CD/DVDThe next thing is to download Ubuntu Linux and create a bootable CD/DVD. Installing Ubuntu LinuxIMPORTANT: I strongly recommend that you plug your Mac into a wired network! It's the best way to ensure that everything get installed properly! (If you only have a wireless connection, during the installation process, you will be prompted to choose a wireless connection. Make sure you select it. In this case, I'm not sure if everything will get installed properly. Although I think most of the stuff should work fine.) Dual Booting and Uninstall on MacWhen your Mac starts booting, hold down the Options key as your machine restarts. You may have to hold down the Options key for quite a while. You can let go the Options key when you are offered to choose between Mac and Windows. (Don't worry, you don't have Windows.) You can press the <TAB> key to switch between the two choices. Press <ENTER> when Windows is selected and you will be booting into Ubuntu Linux. |
||||||||||||||||||||