All your programming assignments can only be graded on nunki.usc.edu (which is a Unix machine
running Solaris) or on a Ubuntu 16.04 machine running inside VirtualBox.
In order to get on nunki.usc.edu, you need to ssh
into it. Unfortunately, our ssh connection over the campus wireless network
can be slow or unreliable. To save frustration, it may be better to develop your work
on a Ubuntu Linux machine running Ubuntu 16.04.
To minimize hardware incompatibility, the best way to run Ubuntu Linux is to install Ubuntu Linux into
a virtual machine. The minimum hardware requirement for running a virtual machine
is that you should have an Intel Core i3 or faster processor with 4GB or more memory,
If your laptop/desktop has a slower CPU or less than 4GB memory, please discuss with the
instructor before proceeding.
All examples below will assume that you have a 64-bit Windows or Mac machine since it's more common these days.
Although inside a virtual machine, we will run a 32-bit Ubuntu Linux system since it takes up less resources.
We will also assume that you will be installing Ubuntu 16.04.
If you already have Ubuntu 16.04 installed in a virtual machine, I would
strongly recommend that you install a fresh and clean Ubuntu 16.04 system
in another virtual machine to be used solely for this class. This way, there won't be any surprises
when the grader grades your programming assignments on his/her Ubuntu 16.04.
(Please understand that the grader is NOT permitted to grade on your machine.)
Ubuntu 16.04 is not the current release of Ubuntu. If you just go to the
Ubuntu web site,
you will be downloading the wrong version of Ubuntu.
To download Ubuntu 16.04,
you need to go to the Ubuntu 16.04 (Xenial Xerus) web site and download a desktop release of Ubuntu 16.04.
We strongly encourage you to use the 32-bit Ubuntu 16.04 (32-bit PC (i386) desktop image).
The only approved virtual machine environments/contains for running Ubuntu 16.04 are:
VirtualBox :
VirtualBox is by Oracle. It is free and it runs on both Windows and Mac OS X.
If you have a Mac OS X machine, I would recommend using VirtualBox.
Please see my instructions for installing Ubuntu 16.04 into VirtualBox below.
VagrantBox :
This system does not have a graphical user interface, so it may not be right for you.
But if you want to give it a try, please see my instructions for installing VagrantBox.
If you are running Windows 7/8/10 and your machine supports "virtualization" in BIOS, it's a good idea to have it enabled.
If you don't know how to do that or check that, just google "Enable virtualization in BIOS in Windows 7/8/10".
Visit the VirtualBox
web site and download, install, and launch VirtualBox. You will get a screen that looks like the following
(please note that your screens may not look exactly like the screenshots below since I'm not updating
these screenshots as they change):

- Click on the New button and enter "Ubuntu 16.04" under Name,
"Linux" under Type, and "Ubuntu" under Version.
By default, it will display "Ubuntu (64-bit)" as the "Version".
You should change it to "Ubuntu (32-bit)" if you are installing a 32-bit Ubuntu 16.04).
Then click on the Next button.
- Change memory size to 2048MB (i.e., 2GB) and click on Next.
(When VirtualBox is running, this much memory will be taken away from
Windows. So, you shouldn't set this value to be too large.)
You should never give more than 50% of your memory to a virtual machine!
- Use the default ("Create a virtual hard drive now") and click on Next.
- Use the default ("VDI") and click on Next.
- Use the default ("Dynamically allocated") and click on Next.
- Use the default ("10GB") and click on Create.
Wait for the popup windows to disappear and then wait for the previous popup windows to also disappear.
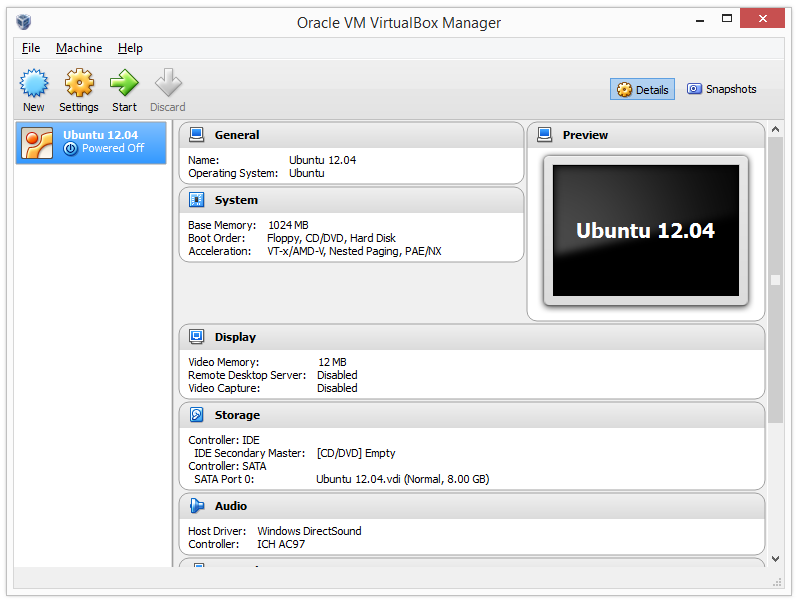
- Your VirtualBox should now look similar to the following (instead of "12.04", it should say "14.04"
because I didn't update the picture to match the version number):
- With "Ubuntu 16.04" selected, click on the Settings button then click on Storage in the left panel
of the popup window. Click on the Empty icon under Controller: IDE and you should see something
like the following:
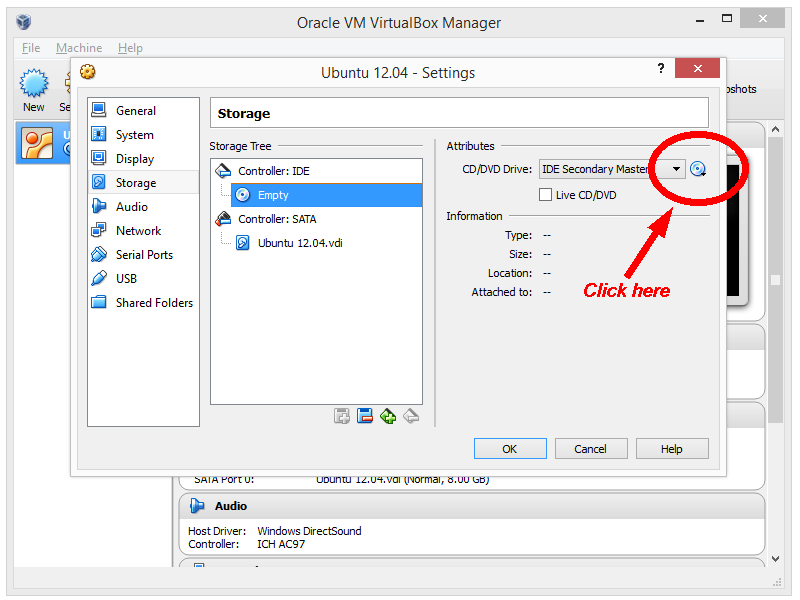
- Now click on the CD/DVD icon as shown above to setup the virtual CD/DVD drive. Select "Choose Virtual Optical Disk File..."
from the popup list, change directory to where you have downloaded the Ubuntu 16.04 .iso image file
(for example, something like from the Ubuntu 16.04 (Xenial Xerus) web site).
If you have not downloaded the .iso, just download it and repeat this step.
Your screen should look something like the following:
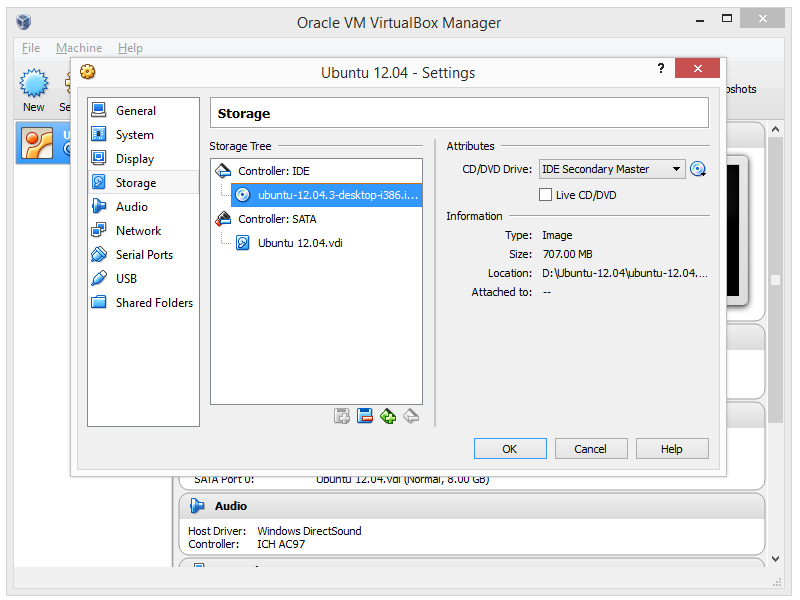
Notice that it's showing the .iso file you have just selected under Controller: IDE (although the picture above
is showing a slightly different version number).
Please note that if a previous installation was successful but when you restart Ubuntu 16.04,
you are asked to install Ubuntu 16.04 again, you should come back to this screen and see what's in the virtual CD/DVD drive.
The virtual CD/DVD drive should not show the original installation Ubuntu 16.04 .iso image file.
If it does, you should eject the virtual CD/DVD drive. (If it's showing something called VBoxGuestAdditions.iso, it's perfectly fine.)
- Click on the OK button and you are done with setting up your VirtualBox.
At this point, Ubuntu has not been installed into your VirtualBox, yet. We are almost there.
- With "Ubuntu 16.04" selected, you can click on the Start button. If Ubuntu 16.04 is not
installed into your VirtualBox, it will install it into your VirtualBox. If Ubuntu 16.04 is installed already,
it should boot it into VirtualBox.
The installation process is similar to installing Ubuntu from a DVD on your machine.
The difference here is that the DVD is a virtual DVD and the machine is the VirtualBox.
Basically, you need to click on Install Ubuntu,
Continue (check the "Download updates while installing" checkbox and uncheck the "Install this third-party software" checkbox),
Continue (keep the "Erase disk and install Ubuntu" selected -- don't worry, this will only erase the 10GB virtual disk),
and Install Now.
A few minutes later, you will be prompted for a bunch of things
such as time zones, keyboard layout, and your loginname and password.
I would suggest that your loginname should be the same as your nunki.usc.edu loginname
and you should choose "Login in automatically".
Please read the on-screen instructions and decide which way you would like to proceed.
The installation process can take quite some time (20 minutes on my Intel Core i3 laptop).
For best results, you should connect your laptop/desktop machine to a wired Internet
during the installation process. If you don't have a wired Internet,
you need to setup wireless networking for your laptop/desktop before proceeding or just not
check the Download updates while installing checkbox mentioned above.
Please note that even though your laptop/desktop may have a wireless Internet connection,
your Ubuntu 16.04 should always use a wired connection because it's
running inside a vitual machine.
When installation is finished, your will be prompted to restart Ubuntu 16.04.
Please follow the on-screen instruction.
After you have pressed the Restart button, if the system looks frozen for over a minute, you
can close the window for this virtual machine. You will be prompted with 3 choices. Select
"Power off the machine" and click on OK. This should unconditionally shutdown the machine.
- After reboot, if you see a popup box offering you to "upgrade the system to Ubuntu 16.04",
make sure you click on "Don't Upgrade"! Otherwise, you have to restart the entire process.
Very important: when you are using Ubuntu 16.04,
you will get offer to upgrade the system. For the purpose of doing programming assignments
in this class, it's okay to "update" the system, but you must never "upgrade" the system!
It's a very important distinction between "update" and "upgrade". When you "update", you will
still be running Ubuntu 16.04. But if you "upgrade", you will end up with something else (and you
will have to wipe everything out and reinstall Ubuntu 16.04 since there is no reliable way to uninstall an upgrade).
- After reboot, you need to install "Guest Additions".
Your VirtualBox Widnows application have 4 menus at the top of the VirtualBox window.
Click on the Devices menu and select Insert Guess Additions CD image... and click on the OK button in the popup window
and click on the Run button in the next popup window. If you are prompted to enter a password, just enter the password you
have setup for your main login account. This will take about a minute to run. When it's all done, shutdown Ubuntu 16.04 and
restart Ubuntu 16.04 from VirtualBox. (Actually, if you check the storage settings for "Ubuntu 16.04" in VirtualBox,
you should see that it's showing VBoxGuestAdditions.iso instead.)
If you get an error message, you may have to eject the guest additions disk first. Look for a icon in the left ("Launcher")
panel for something that looks like a CD (and if you move your mouse over it, you will see something like "VBOXADDITIONS_..."
or something else that starts with "VBOX"). Right click on it and select Eject.
- There are a couple of useful things I would do to make life a little easier for
transfering data between the Windows host and Ubuntu inside VirtualBox.
You don't need to do this if everything you need to do can be done inside the Ubuntu 16.04 VirtualBox.
I do it because I cannot print from the Ubuntu 16.04 VirtualBox and I have to go to Windows to print documents.
The features I use in VirtualBox are called Shared Clipboard and Shared Folder.
To set these up, you must first shutdown Ubuntu.
In VirtualBox, you go to Settings for "Ubuntu 16.04"
and click on General in the left panel. In the right panel, click on the Advanced tab.
Change Shared Clipboard to Bidirectional so that you can copy and paste between Ubuntu 16.04 and Windows.
Also, click on Display in the left panel. In the right panel, check the "Enable 3D Acceleration" checkbox.
(If you don't do the last step, graphics will be very slow inside your virtual machine.)
Click on Shared Folders in the left panel then click on the icon on the right with a blue folder and green plus sign on it to add a shared folder.
Click on the Folder Path drop-down list, select Other..., and select a folder (I would create a brand new folder somewhere first and share it;
I named the folder "shared-virtualbox-14.04"). By default, it will then show the folder path you just selected. Under Folder Name, it will show the
name of the folder. You need to memorize the name of this folder because you will need to use a matching name when you get back to Ubuntu.
Check the Auto-mount checkbox and click on OK and then click on OK again to finish setup. Now start Ubuntu 16.04
After you login to Ubuntu 16.04, you should create a mount point for the shared folder. For example, to create a mount point called
"/mnt/shared-windows", do:
sudo mkdir /mnt/shared-windows
From this point on, if you want to access the Shared Folder, just run the following command in a terminal (assuming that the name
of the folder is "shared-virtualbox-14.04"):
sudo mount -t vboxsf -o uid=1000,gid=1000 shared-virtualbox-14.04 /mnt/shared-windows
If you put anything into /mnt/shared-windows, it will show up in Windows, and vice versa.
If you forget the name you gave for the shared folder, just run the df command and look for something that looks like /media/sf_*.
The name is in the left-most column.
- At this point, you should follow the procedures to install login shell and
install additional software needed for doing our programming assignments.
Other Resources
Here are a couple of YouTube videos on how to install Ubuntu Linux in VirtualBox in general.
Here are more YouTube videos on other things you may need to do to your computer.
On your Ubuntu desktop, there are a bunch of buttons on the left. This is the
Laucher area. It's like the Dock on Mac OS X. Here's a brief explanations
of the functionalities of these buttons in the Launcher.
 |
This is the "dashboard" button and it allows
you to search for a program on your machine
and run it. If you simply press the <ALT> key (or the
Windows key, if you have a Windows keyboard) on your keyboard,
it would be the same as pressing this button.
Try this... Click on it and type "Terminal" and click on the
Terminal icon to run
the gnome-terminal program. A Terminal button will be added temporarily
to your Launcher. Right-click on that button and select Lock to Laucher since you
would most likely use the gnome-terminal to ssh to
nunki/aludra.usc.edu. The gnome-terminal program can have
multiple tabs. You can press <Cntrl+Shift+t> to add a tab and press <Cntrl+PageUp/Dn>
to circulate between tabs. Select Set Title from the Terminal menu to give each tab a title can
also be quite useful.
This gnome-terminal program is very important for this class!
When you compile your program using a Makefile, run the gcc/g++
compiler, or ssh to nunki.usc.edu, you will be running these commands
from such a Terminal.
If you cannot see anything inside gnome-terminal, try clicking on
Profile Preferences under the Edit Menu, selected the Colors tab, and uncheck
the "use colors from system theme".
|
 |
This lauches your filesystem viewer (similar to Windows Explorer
on Windows or Finder on Mac OS X).
|  |
This lauches the Firefox web browser.
|  |
This lauches the LibreOffice Writer program. It's quite
compatible with Microsoft Word. It can read and write .doc, .docx,
and .rtf files.
|  |
This lauches the LibreOffice Calc program. It's quite
compatible with Microsoft Excel. It can read and write .xls, .xlsx,
and .csv files.
|  |
This lauches the LibreOffice Impress program. It's quite
compatible with Microsoft PowerPoint. It can read and write .ppt and
.pptx files.
|  |
This lauches the
Software Center whenere you can download and install additional software
onto your machine (kind of like an App Store). In addition, it can also
show you what programs are installed on your machine and let you uninstall them.
If you use Adobe Photoshop a lot, the free software that comes closest to the
functionality of Adobe Photoshop is probably the "gimp" program. Launch
the Software Center and type "gimp". The rest should be easy to figure out.
Sometimes, the Software Center popups by itself if you are installing something
in Firefox. For example, if you go to "www.youtube.com" with Firefox,
you should see that a plugin (to play Adobe Flash) is missing. If you proceed to
install the plugin on Firefox, you will see that the Software Center is needed to
finish the installation.
|  |
This lauches the Ubuntu One client program.
Ubuntu One is a free "personal cloud".
Unfortunately, Ubuntu One has been discontinued.
For backuping your assignment files and collaborating with your group members,
please see the section on Git and GitHub below.
|  |
This lauches the System Settings program (similar to
Control Panel on Windows and System Preferences on Mac OS X).
|  |
This lauches the Update Manager program (similar to
Windows Update on Windows). This button is only visible sometimes.
If you click on this, please read all the messages very carefully. Remember, it's okay to "update" the system and you must
never "upgrade" the system.
|  |
This lets you switch workspaces (not the same as desktops).
By default, you get four workspaces. After you click this button, double-click which
workspace you want to work in. This is pretty useful if you are running too many
applications all at once.
|
If you have a small laptop, you can right-click on the 3 LibreOffice buttons
and uncheck "Keep in launcher" to remove these button. You can still access these
applications from the dashboard.
By default, your login shell is bash. If you want your login
shell to be tcsh, you need to install it first. But you have
to wait for all other installation activity to finish before you can
proceed. After all other installation activity are done,
start Terminal and enter:
sudo apt-get install -y tcsh
You will be prompted for your password, so go ahead and enter it.
After installation is done, you can change your login shell by
doing the following:
chsh
You will be prompted for your password, again. Then enter:
/bin/tcsh
Next time you reboot, your terminal will be running the new login shell.
Many software on Ubuntu Linux are free, although they may not be
installed by default. You can use the Software Center
to install more software. Alternately, you can install them over the commandline using
the Terminal (i.e., gnome-terminal) program, if you
know the precise names of the software packages.
To use lynx and libssl-dev (these two are required for pa2),
wireshark (for labs), and g++ (which is required if you want to develop C++ code on Ubuntu 16.04),
you can enter the following commands to install them:
    sudo apt-get update
    sudo apt-get install -y lynx
    sudo apt-get install -y libssl-dev
    sudo apt-get install -y wireshark
    sudo apt-get install -y g++
The apt-get is the program for downloading and installing
a piece of software. But only administrator can install software.
Although you are an administrator on your own machine, you do not run at the
administrator privilege level normally. The sudo command is
used to temporarily raise you security privilege to the level of an
administrator in order to execute the rest of the command you typed into the
commandline.
Therefore, when you run the above command, you will be prompted to enter your
password before the rest of the command can be executed. The good news is
that if you run the sudo command subsequently in the same console,
you will not be prompted to enter your password, unless your console has been
idle for some time.
Please note that you can only run one instance of apt-get at a time.
Internally, the Software Center also
invokes apt-get to download and install software. So, if the Software Center
is busy installing a program, you will be blocked from running apt-get
until the Software Center is finished.
By default, your login shell is bash.
If you would prefer to use tcsh as your login shell (so it's more
like the default USC Solaris environment on nunki.usc.edu), please also
install tcsh and switch to using it as your login shell.
Please remember that for CSCI 353, you can only install packages
from standard repositories. This means that you must not change the repository
either using the Software Center or using the add-apt-repository program.
It is imperative that your group uses a version management system.
The software of choice is Git,
originally designed and written by Linus Torvalds.
If you are not familiar with Git, please read the free online book, Pro Git,
mentioned in the textbooks section of our course description web page.
There are free web sites on the Internet that provide free Git repository service.
You should be able to create an account there and share it along your team members.
Please make sure that your code is private so that no one other than your
team members can see or change the code. Please note that if others (such as the
teaching staff) can see your code repository (because it is not private),
it will be considered cheating and there are serious consequences. As I have
mentioned in the first lecture, you do not have the right to display your
assignment-related code in public (even if your prospective employer asks you to).
If you display your assignment-related code in public in the middle of the
semester, your group will get a zero for the assignment. (If others have cheated off
of your code, then your case will be reported to the university and everyone in your group
may end up failing the course.) If you display your assignment-related code in public
after the semester is over, I will ask the university to change the grades of everyone in
your team because you are helping future students cheat. So, please make double sure
that your code repositories related to this class are all private.
To start using BitBucket/GitHub, please visit the projects page.
Some students have reported that they had trouble installing Ubuntu 16.04 into VirtualBox.
It does not mean that these systems won't work.
I'm just keeping track of what people have seen here.
It usually mean that the standard procedure may not work and you should
try the suggestions in " Solutions" below to see what you need to do.
If you have the same system and are experiencing the same problem, please send me an e-mail
so I know the problem is wide spread. If you are having trouble getting Ubuntu 16.04 to
work on a system that's not listed, please send me an e-mail so I can add it to the list.
| System |
Description |
Solutions |
|---|
| HP Spectre running Windows 10
| Get error message "VMware Player unrecoverable error: (vcpu-0)" when starting Ubuntu.
| Enable "virtualization" in UEFI BIOS. (If you don't know how to do that or check that, just google "Enable virtualization in UEFI BIOS in windows 10".)
|
Lenovo G500 (Windows 8),
Dell Inspiron 15R (Windows 8) |
After installation, when it asked you to reboot, the VM crasheed with a message saying,
"Oracle VM VirtualBox Manager has stopped working". |
| 1)
|
| Just ignore the crash (since installation was completed)!
Reboot VirtualBox and start Ubuntu and it should work. (If it starts
installing Ubuntu again, this means that it did not work.)
| | 2)
|
| If (1) doesn't work, instead of using VirtualBox, try the
VMware Workstation Player 12.
The installation steps are kind of similar.
|
|
| HP Pavillion G6 running Windows 8.1
| Get error message "VMprocess could not be started".
| According to
https://www.virtualbox.org/ticket/13187,
a solution is to: "uninstall and reinstall 4.3.12". Got to older builds of VirtualBox,
click on 4.3 and look for 4.3.12 and give that a try. (Please note that I have not verified that this is a valid fix.)
|
| HP Stream 11 running Windows 8.1
| When finished installing VMware Player 7,
Ubuntu reboots with a small screen and the bottom of the screen says "installation failed for VMwareTools".
| Try the following:
    cd /tmp
    tar xzf /media/VMware\ Tools/VMwareTools-*.tar.gz
    cd vmware-tools-distrib
    sudo ./vmware-install.pl
When prompted, just press <ENTER> to accept default values for everything.
|
| Mac OS X
| Switching or moving windows is slow inside VirtualBox
| Make sure you turn on 3-D acceleration.
Shutdown VirtualBox and restart it. Select Ubuntu but don't start it.
Clickc on Settings and then Display and make sure the 3-D accelation checkbox is checked.
|
| VirtualBox (in Windows)
| Wifi stopped working
| If you have something called Lavasoft Web Companion, it may have interfered with
VirtualBox networking. Uninstalling Lavasoft Web Companion would fix the problem.
Please see https://superuser.com/questions/1192452/networking-on-virtualbox-suddenly-stopped-working.
|
|